Today we will talk about photo studio equipment.
How to work with studio light? What attachments for devices exist and what are they used for? We will tell you everything you need to know to work effectively in the studio.
So we came to the studio. While your model is doing her makeup, we will set up the studio lighting.
First, let's find out what types of devices there are.
Types of devices
There are two types of lighting devices - pulsed and constant.
- Pulsed light
Used in photography only. These devices produce a short but very powerful pulse of light when the camera shutter is released. For communication between the lighting device and the camera, a synchronizer is used, the operation of which we will discuss below. - Constant light
Used in photo and video shooting. Constant light has two serious disadvantages - it consumes a lot of electricity and at the same time generates a huge amount of heat. That is, the person you are filming can literally overheat. But, for example, in product photography, constant light is often used.
Almost all photo studios have pulsed light. Therefore, if you want to shoot in a studio, first of all you must learn how to work with pulsed light.
Most pulsed devices have a built-in conventional pilot lamp. What is it for? So that you can roughly see how the light “falls” on the model. With the help of a pilot light lamp it is much easier and more convenient to set the lighting in the studio.
As I said above, synchronization is needed for the lighting fixture and the camera shutter to fire at the same time. Each device contains a device that triggers a flash when a pulse is detected. Thus, it is enough to synchronize the camera with one device.
Of course, synchronization occurs in an instant.
The minimum shutter speed available during synchronization depends on the camera's capabilities and is typically 1/200.
There are three types of synchronizers:

You can also use the flash built into your camera for synchronization. But to prevent the light from the built-in flash from interfering with the frame, you need to cover the flash itself (this can be done with a simple piece of paper), and in the camera settings set the minimum power for the built-in flash.
Synchronization via the built-in flash is an extremely inconvenient method; it quickly drains the battery. And the time it takes to recharge the built-in flash becomes wasted. You won't be able to get a few good takes quickly.
How to work with lighting fixtures
Different studios have devices from different companies and their control interfaces differ significantly. Therefore, it is impossible to create a universal “operating manual” for lamps.
Hensel Pro is one of the most common lighting devices.

In many ways, the control of devices from different companies is similar, but if you have never worked with lighting devices, then it would be best to come to a photo studio with a familiar photographer who can explain and show you all the intricacies of control. Also, in most photo studios, the studio owner himself will be able to briefly tell you the basics of working with lighting devices.
Lighting attachments
The device itself is just a light source. To control the flow of light, attachments on devices are used. It is by using different attachments that you can get the light that you need.
- Standard reflectors

Gives hard directional light. Most often used in combination with honeycombs or curtains. - Umbrellas

Umbrellas provide soft and diffused light. There are two types of umbrellas - reflective and transparent. 
Soft boxes are usually rectangular structures that diffuse light. Today, most photographers work with soft boxes when they need to get soft, diffused light. The nature of the lighting of a soft box depends on its shape and size. In addition to the usual rectangular soft boxes, we can also distinguish two separate and popular types of this attachment:
Long soft boxes, the length of which is several times greater than the width. Strip boxes are most often used to illuminate full-length models, as well as when photographing large objects. Strip boxes are great for creating long, narrow highlights on reflective surfaces.
Large diameter octagonal soft boxes. Used as a key light for group portraits. In portrait and product photography, they give a round shape of highlights in the eyes of models or on glossy objects.
Thanks to the design feature of the “beauty dish,” the light is both concentrated and soft. That is why this attachment is used when shooting portraits. Also, the “beauty plate” effect can be complemented with honeycombs or soft attachments.- Background reflectors

These attachments allow you to evenly illuminate the background while preventing light from entering the camera lens. - Tube (another name for “spot”)

Conical nozzle. Makes it possible to set light accents, highlighting a small detail of the scene with light. Simply put, you can direct all the light of the device to one point. - Universal holders

The holders are attached to the reflector for installing additional attachments - filters, honeycombs, curtains. - Curtains

Nozzle with 4 movable scenes. Allows you to limit the spread of light. Together with the curtains, you can install a filter or honeycomb. - Honeycomb

Nozzles having a fine-mesh structure. Used to produce a beam of parallel rays. Honeycombs are used for backlighting; they do not give glare towards the lens and allow you to do without curtains or shades. Honeycombs also imitate sunlight - like the sun, they produce parallel rays. - Color filters

Change the color of the light beam. Unlike lens filters, which affect the entire frame, attachments are installed on individual lamps and allow you to precisely change the color of the lighting. For example, you can put a red color filter on a backlight and get an interesting red halo around the model.
We sorted out the devices, pointed a couple of soft boxes and a backlight with a honeycomb attachment at the model. But how do you determine what shutter speed and aperture settings to set so that the picture doesn’t turn out overexposed or underexposed?
Exposure metering

As you understand, camera metering does not help in any way when shooting in a studio. After all, full illumination of the model occurs only at the moment the device pulses are triggered, and the camera cannot calculate the required exposure in such a short period of time.
Professional photographers use an exposure meter to assess the degree of illumination. But working with an exposure meter requires certain skills and experience, and besides, an exposure meter is a fairly expensive device.
There is an easier way to determine the presence of overexposure or underexposure - use the image histogram to analyze exposure. You can read about how to learn to “read” a histogram in our article, which is entirely devoted to working with a histogram.
Shooting practice
Knowledge of how photo studio equipment works is a necessary basis for shooting in a studio. But you also need practice!
Now we only have to discuss one, but very important topic - lighting schemes. The atmosphere and mood of your shot depends on how you set the lighting.
We will talk about lighting schemes and their setup in the studio in our next article.
Every photographer knows that light is the most important tool when creating a great portrait.
Below I offer for consideration a simple classification of studio lighting schemes that will help you achieve excellent results. Types of light sources
Painting light
The main and powerful light source that creates hard (reflector with shutters) or soft shadows (diffuser, softbox, umbrella, reflector).
Fill light
Additional lighting sources with softboxes, diffusers, etc. You can also use reflectors, background light, and backlight for a fill effect. Often shutters are used to allow you to control which areas to illuminate and which to leave in the dark.
The procedure for setting the light in the studio
First of all, you must set the background light and then set the backlight. This order will allow you to see the effect produced by these light sources. The next step is to install the fill and then the key light. It is also important to know what effect each light source gives; to do this, turn the flashes on and off one by one. And you will definitely get a result that will satisfy you.
There are several types of illumination of the model's face: wide light and short light (front, side, and various options thereof)
Wide light - full illumination of the side of the face aimed at the camera
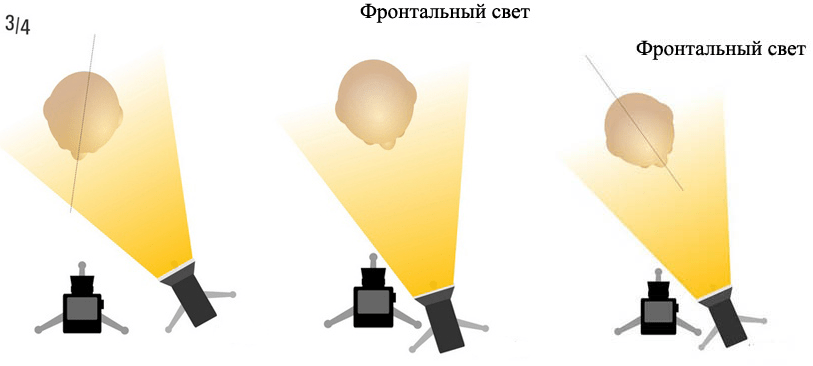
Three-Quarter Lighting: Wide Type
Universally positioned key light for formal photography. The light source is placed near the camera to illuminate the side of the face facing the camera. Shadow is minimized. This is the most suitable type of lighting for normal and narrow faces.
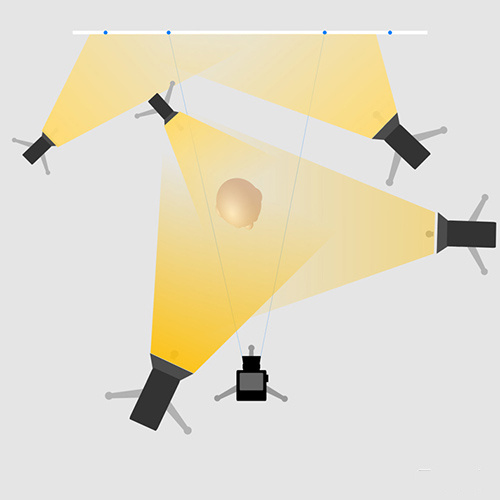
Paramount (glamorous light)
This type of light is named after the Paramount studio and is also known as butterfly, Hollywood or glamor light. This is a soft and “feminine” highlighting light aimed directly at the model’s face and allows you to idealize her skin as much as possible. The drawing light is placed on the right above eye level, the filling light is there, but below the drawing light. You can also use a reflector on the side of the model. This way we will form a symmetrical shadow from the nose, which should be no more than half the length of the lips.

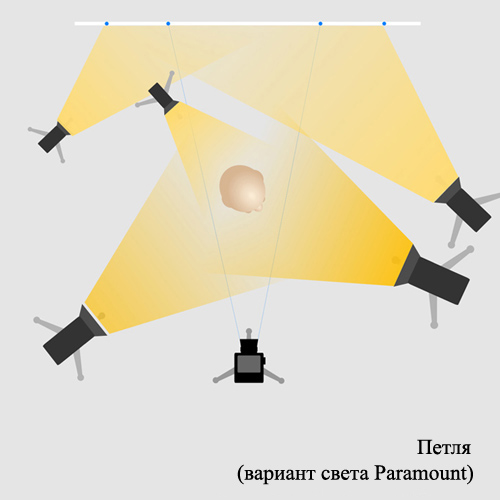
Loop (Paramount circuit variant)
This light pattern allows you to create a beautiful shadow on the model’s cheek, which is closest to the highlighting light. The key light should be lower than when used in the Paramount scheme and placed closer to the background. The fill light should be level with the camera, higher in relation to the main light and located opposite. Lighting Loop helps to widen the face and is suitable for working on narrow faces with ruddy skin. The loop from the nose area should not touch the shadow area of the side of the face. This is the most interesting lighting scheme. This lighting scheme creates an interesting three-dimensional effect on the model's face and body.
Short light - full illumination of the side of the face that is not directed towards the camera
Partial (narrow) illumination of the side of the face that is directed towards the camera. These patterns are useful when you are photographing wide faces. This is a very interesting and dramatic lighting scheme as the viewer sees more shadows. Also, this light sharpens the facial features a little.

3/4 light pattern
Light sources are located in 3 quarters: the universal location of the key light is suitable for various types of faces. Minimum illumination visually narrows the face. This is an acceptable lighting solution, even if the model turns her head to the side during shooting.
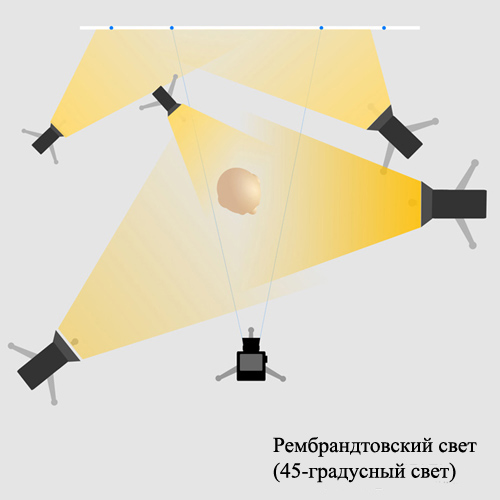
Rembrandt light (45 degree lighting)
Dramatic, “masculine”, mood light. A very interesting light scheme where the source of the highlighting light is placed at cheek level. It's not a bright light. On the shadow side of the face, a typical triangle of light is obtained.
Divided Light
This type of lighting creates an effect similar to a burning candle: only one part of the face is illuminated. The key light is at nose level. The fill light can be raised or moved closer to the camera. This is very effective for significantly “narrowing” the face and nose, hiding any facial defects.

Profile light
Lighting the profile/contour of the model. The key light (when photographing the model's profile) is placed behind the subject (the person is looking at the reflector or the key light source). Profile-edge. You must create outline lighting using a key light. When using a key light to highlight the haircut, raise the light source slightly to achieve the effect.

Many novice photographers take their first steps with natural photography. Here nature itself sets the accents, sets the light, and the photographer can only see the picture and capture the moment. There are few such “tips” in studio work. You need to think through the image yourself, arrange objects and set the light. At the same time, photo studio equipment may differ in power, quantity and lighting effects. In this article we want to talk about some of the features of light arrangement in a photography studio and its use.
Almost any photo studio has a white background in its arsenal. It allows you to take portrait and product photographs. This is the most common type of work for photographers: photos for documents, photo catalogs for online stores, advertising work, etc. At the same time, to get an image on a pure white background, just the color of the background itself is not enough. Without the right lighting it will end up with a gray tint. To do this, photographers use an additional light source for the background - a soft box (light box), which provides soft scattering light. And in order for the background to appear pure white in a photograph, it is necessary to illuminate it - to make the background lighting a little brighter than the lighting of the object itself.

However, during professional work, more complex rules for arranging light in a photography studio are used. The main indicator here is exposure - the amount of light received by the photosensitive element; in other words, how much light the frame is filled with. Exposure can be changed using the shutter speed and lens aperture. At the same time, it is very difficult to determine “by eye” the correct placement of lighting fixtures in the studio and select the required shutter speed and aperture opening. Moreover, the concept of “correct exposure” will be different for each frame. In such cases, professionals entrust their measurements to an exposure meter or flash meter - a special measuring technique that allows you to correctly set the aperture and shutter speed, determine the brightness and contrast for each individual photograph.
Before starting a photo shoot, it is necessary to think in advance about the arrangement of lighting fixtures, the height of their location and possible filters. Next, all the necessary lighting fixtures are displayed step by step:
Painting light- This is the main source of lighting in the lighting scheme. It is he who draws the main volumes of the object, hence the name. In the English-speaking world, this light is called “key light”, i.e. key light. Source painting light There is usually one, and it is the most powerful compared to the others. Side or top light is classically used as a key light.
Fill light- light that is used to uniformly illuminate the entire scene. It is usually used either to highlight shadows or to generally equalize the illumination in the frame in order to be able to properly expose the photo at the desired shutter speed and aperture values.

Modeling light used to create accents (emphasizing highlights) or softening individual shadows on the subject. Typically, the modeling light is narrowly focused, and its power is set so as not to interrupt the main cut-off pattern.
Backlight(also called contour) is created using a source located behind the model. It is usually used to separate the model from the background, to create accents and artistic highlighting of the contours of the figure. In classic portraiture backlight directed either from behind or from behind at an angle (from behind the shoulder). Schemes using backlight are the most beautiful. Backlighting looks impressive in portraits of men, and also looks interesting for highlighting voluminous hairstyles on girls. By the way, it is thanks to the backlight that photographs taken at sunset seem so magical!
Background light— as you can guess from the name, it is used to highlight the background. The fact is that due to the distance between the background and the model, when using, for example, one light source, the background turns out to be darkened. This does not mean that it necessarily needs to be backlit; sometimes background light is not used specifically to create such an effect of depth of space. Light is directed onto the background either pointwise (creating a light spot behind the model), or evenly (lighting the entire surface of the background equally), or creating a soft gradient transition.
Sometimes I use photographers Leveling light it is needed for balance Drawing and in brightness is between Filling out And Drawing.

Of course, the simultaneous use of all types of lighting in the studio is impractical and often leads to an outright mess in the photograph. In practice, it is quite sufficient to use schemes with one, two or three lighting sources, which successfully allow you to complete all creative tasks.
In the following lessons we will look at various lighting schemes, ranging from the simplest, but at the same time one of the most effective schemes, a scheme with a single light source, to complex ones that allow you to correctly photograph the naked body and multi-figure compositions.
As a rule, if you change the brightness of the flash, the brightness of the modeling light will also change proportionally, so that the photographer sees the real picture. The binding of the brightness of the modeling light to the brightness of the pulse light can be disabled or the modeling light can be turned off completely. Personally, before shooting, I check to see if the brightness of the modeling light changes when I change the flash power. It’s more convenient for me to immediately see what’s happening with the light and shadow pattern.
Also on studio flashes you can select method of synchronization with the camera. Synchronization can be carried out over a radio channel. To do this, a radio transmitter is placed in the hot shoe of the camera (flash socket), and a receiver is located in the studio flash. The second standard way of synchronizing a studio flash and a camera is the reaction of the flash to a sharp change in brightness in the room. The studio flash has a light trap and if it is turned on, the flash will fire if there is a sudden change in brightness in the room. For example, if another flash fires. Exist infrared synchronizers. They are placed in the hot shoe of the camera and when the photographer takes pictures, these synchronizers give a flash of light in the infrared spectrum, which does not affect the overall light-shadow pattern, since it is practically invisible by the camera’s matrix, but it fires studio flashes. Infrared synchronizers have disadvantages. If the studio flash is hidden in a corner or behind a set, it may not “see” the infrared signal. In addition, sometimes on glossy surfaces, infrared synchronizers leave red highlights in the frame.
Modern studios usually use radio synchronizers. Sometimes the radio receiver is hung on one flash, and the others “catch” the difference in brightness and fire triggered by the one on which the synchronizer receiver hangs. But that's sometimes. Most often, all flashes have a radio synchronizer receiver.
When you come to the studio, you are given a pre-configured synchronizer and you just need to put it on your camera and you can start shooting.
Sound confirmation of readiness for work.
After the flash fires, it needs some time to recharge (half a second / second). When the flash is recharged and ready to use, it beeps.
Reset charge when power decreases.
Usually, after being turned on, a studio flash accumulates a charge within half a second/second, after which it is ready to release this charge in the form of a light pulse. The more charge the flash accumulates, the brighter it will burn. The flash “decides” how much of this charge to accumulate depending on the value set on the pulse power (brightness) control.
If you want to increase the power, turn the control and the flash will accumulate more charge.
And if the flash has accumulated a charge, and you then reduce the power, it will need to reset some of the accumulated charge. In modern flashes, if you reduce the charge, the flash immediately after reduction itself puffs, dumping “excess electricity”. But if the studio is not new or cheap flashes, you need to press the “test” button after reducing the power to dump the excess charge. If you don't do this, nothing bad will happen. It’s just that the first photo taken after reducing the power will be overexposed, since the puff will be at the same power that was before the reduction. And then the flash will produce the power that you set.
Sometimes they ask me Can the built-in flash in the camera trigger studio flashes?
Yes, but it is important to understand that an on-camera flash can only fire studio flashes in “manual” mode. If your camera has the ability to turn on the “manual” mode on the flash, you can set the flash built into the camera to minimum. Then it will not interfere with the cut-off pattern, but its impulse will be enough to trigger the studio sources. In the studios we turn on the light trap and work calmly.
If the flash built into the camera can only work in TTL and does not have a “manual” mode, you won’t be able to use it to launch studio light sources without dancing with tambourines. In TTL, the on-camera flash produces two pulses. The first is a test one, when the camera curtains are still closed. Accordingly, studio flashes will fire a test pulse, and your camera is not yet shooting at this time. It shoots during the second main pulse. But since the studio flashes reacted to the first test impulse, then at the moment of the main impulse, when the camera is shooting, the studio flashes will be recharged and will not fire.
On many cameras, the built-in flash cannot operate in manual mode (only TTL). But this is not a problem, every studio has several synchronizers and it is unlikely that you will need to use an on-camera flash to synchronize with the studio ones. If you still want to know the dance with tambourines.
Basic buttons and controls on studio flash.
- Brightness control
- Turning on/off the light trap (synchronization based on changes in brightness in the room)
- Turn on/off the modeling light
- Disable the brightness binding of the pulse and modeling light.
- Enable/disable audio confirmation that the flash is charged.
- Radio channel. It is necessary that the flash and synchronizer work on the same channel. The channel is configured separately on the flash and separately on the synchronizer.
- Test button. Pressing this button fires the flash. There is such a button on both the flash and the synchronizer.
Why do I...
Black stripe on the side of the frame? The shutter speed is too short - setting it to 1/125 will definitely save the situation, perhaps 1/200 will do, but shorter is no longer an option.
Is your studio flash plugged in but doesn't fire? Check if it is on the same channel as the synchronizer. If you don’t know how to check, call the studio administrator.
Many photographers feel quite confident when shooting with natural light outdoors, but as soon as it comes to working in the studio, they begin to get lost. How many light sources to use? How to arrange them? What power should I set on each source? What if you don’t get beautiful lighting?
I ask myself these questions every time before an important shoot, but answering them gets easier and easier every time. Everything comes with experience, but basic knowledge of the principles of working with light It is better to learn in the first days.
Soon a new one will appear in the Studyfoto project store translation of a series of video tutorials by an American photographerJoelGrimes, which talks in detail about the basic laws of lighting for photography and clearly shows how to set the light in the studio for shooting portraits.
In the meantime, let's look at the basic laws of light distribution in space, which will help you understand the basics of lighting in the studio or on location.
Softness (hardness) of light.
 Let me remind you, that the softer the light, the less sharp the transitions between light and shadow. Hard light, on the other hand, is characterized by deeper and sharper shadows and brighter highlights.

ABOUTThe main factors that influence the degree of lighting hardness:
Size of the light source in relation to the subject:
The larger the size (area) of the light source in relation to the size of the subject, the softer the light will be.
This leads to 2 conclusions:
Conclusion 1. To get soft lighting, you need to use a large area nozzle on the light source (for example, a large softbox, octobox, umbrella).
 Conclusion 2. The closer you move the light source to the model, the larger its “relative” area becomes (the law of perspective works - the closer objects are, the larger they appear). Means The closer the light source is to the model, the softer the lighting becomes.
Note. Remember to reduce the power of the light source as it gets closer to the model in order to obtain the same intensity of illumination.
The nature of the nozzle or the light source itself.
For lighting, you can use either a “bare” light source (flash, monoblock) without attachments, or attachments that scatter and reflect light.
Most hard light will be obtained from a directional studio source (or flash) without the use of attachments. In this case, the relative area of the light source will be minimal.
 To the scattering nozzles This includes softboxes and octoboxes of various shapes and sizes, as well as skylight umbrellas. A white translucent material stretched in front of a light source diffuses the light, creating a softer, more even light output while increasing the area from which the light is emitted. All this contributes to softer and more uniform lighting.
 Reflected light differs in a slightly sharper pattern than diffused. However, it is much softer than the light from a naked flash. Reflected light is obtained by using reflective umbrellas or reflective panels, light discs or even ceilings or walls.
 If light from a source is first reflected from some surface, and only then hits the subject, then essentially the reflective surface becomes the source emitting light. Therefore, often in studio lighting schemes, reflectors can be considered as an additional light source. For example, if you are working with just one monoblock, a flash, or even window light, when you add a reflector you will actually have a lighting scheme with 2 sources.
Accordingly, the larger the reflective surface, the softer the light will be and the larger the light spot will be. So, for example, light reflected from a white ceiling will be much softer than light reflected from a light disk with a diameter of 60 cm.
The nature of lighting is also affected reflector surface texture(reflective material). Usually as a reflector
It uses white or metallic surfaces. Metallic materials reflect light more intensely than white matte surfaces.
Therefore, to create ultra-soft lighting when shooting beauty portraits, the model is sometimes surrounded by large white reflective panels that provide an even fill light.
In the following articles we will look at what it depends on:
1. Light distribution area
2. Light intensity (brightness)