Night photography is not easy, but it can be one of the ways to create artistic shots. It's not just landscapes that can be photographed effectively at night. Portrait photos taken in moonlight look mysterious and unusual. Even ordinary, familiar things that do not cause any interest during the day can become fascinating. To achieve a good result, you need a camera and a tripod.
People often think that high-quality night photos require an ultra-expensive SLR camera with a similar price fast lens. Another misconception is that a DSLR must have an ISO of 1600 or higher. In fact, all that is required is manual adjustment (M) or shutter priority setting (TV). An 8 second shutter speed is enough for shooting. A tripod will provide the necessary stability for the device. The sensitivity of the matrix and the lens aperture are not so important during a night session. They are compensated by a long shutter speed. When photographing at night, mount your camera on a tripod. It needs to be stable, hard, and about twice as heavy as the camera. Then the device will not sway “like in the wind.” If you don't have a tripod, place the camera on a hard, level surface. This position allows you to shoot at long shutter speeds without raising the ISO, so that there is no strong noise, which is inevitable when it is increased. Turn off the stabilizer. It works at a shutter speed of ¼ sec for handheld photography. Switch to “Manual” mode. Sometimes it is missing, then the program exposure mode (P) will do. Turn off the built-in flash. She won't cope in the conditions night shooting, will illuminate only one nearby object, everything else will remain in the dark. Autofocus and exposure metering will not help you take a good night photo.


Don't make your shutter speed too long. Even Photoshop can’t save “overexposed” photos. Take at least three frames - darker and lighter, then choose the best one. Night photography as an art form is described in Lee Frost's book Night and Evening Photography.
“If you want to make money from photography, go shoot at night,” photographers often say. It's hard to argue with this. Indeed, shooting a city at night, colorful lights, unusual colors, glare
Bright reflections and a completely special color and mood find their buyer faster than photographs of most other genres. But this is only one, and far from the most important, reason to go at sunset with a camera to take good shots. The most important thing, in my opinion, is the pleasure from the process of night photography and, of course, from the subsequent looking at beautiful photographs.
But night photography, like any other type of photography, has its own specifics. In this article I will tell you how I take night photos.
What we need:
Necessarily:
1. Tripod.
2. Lens hood.
3. Camera (how else).
You may need:
1. Remote control remote control from the camera.
2. Cross filter.
3. Gradient filter.
4. Polarizing filter.
Tripod:
I highly recommend for night photography Always use a tripod. You can’t count on being able to shoot it with your hands without blur at a long shutter speed. Of course, you can hope that the camera will be able to be placed on a side, railing or some kind of curb. But practice shows that, firstly, the necessary support point may not be found, and if it is found, it will most likely be inconvenient - the camera on the railing will be held unsteadily, and you will be very limited in the choice of angle.
Exposure selection:
I almost always shoot night shots in manual mode. First I select the aperture. The tighter the “hole” is clamped, the greater the depth of field, that is, the clearer the details in the distance become. For urban and architectural photography, I usually keep my aperture down to 14-18.

Original source of the article: http://www.digicam.ru/
There are photographers who don’t go out at night. Many people have the impression that due to the lack of natural light, whatever you shoot will come out blurry, noisy, or dark. In fact, in most city centers there are plenty of photographic opportunities just waiting to be exploited, all with just available light.
Where to start?
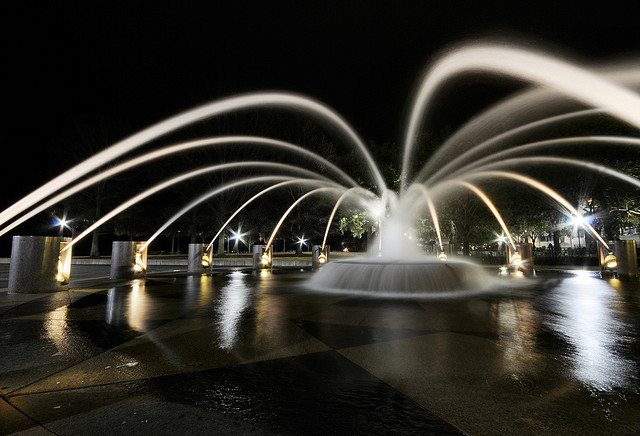
First of all, you need to find a suitable location. I would recommend a vibrant city center which has a huge variety of potential subjects to shoot and a choice of light sources such as transport systems, architecture and features such as fountains and statues.
Start working in a familiar environment, somewhere where you feel safe and know where the best vantage points and views are. It might even be better to take a friend with you to be on the safe side. You should probably plan your route, stopping at various points of special interest. This will give your walk some structure and you will be able to work in a variety of conditions.
It's a question of time
So, once you have decided where you are going, you should think about the time at which you will visit the chosen place. Check online when the sun sets and plan your trip around that time. My favorite time to shoot is twilight, so I arrive at the location about half an hour before sunset. This way you can work in the twilight hour before it gets dark and you start your work in the dark.

Shutter priority
I recommend that you start by setting your camera to shutter priority mode, which will allow you to judge the amount of light needed for specific types of shots based on the availability of natural and artificial light.
Try starting with 1 or 2 seconds, depending on whether you are working with static or moving light sources. Because you're letting enough light into the camera using an adequate shutter speed, you can afford low ISO settings to get a sharp photo.
If you are comfortable working in full manual mode, then I suggest choosing a narrow aperture, around f/12 to f/16, which will allow you to get greater depth of field for wide shots.

What is the temperature?
You should shoot in RAW not only because the format provides versatile editing capabilities for photos taken in difficult lighting conditions, but also because it is extremely useful for changing white balance. The light sources available in urban environments vary greatly and therefore the color temperature of the light also varies, so in this case it is very important to be able to control the white balance during post-production.
Gear up
Given that you'll be working at slower shutter speeds, handheld shooting will be impossible, so you'll need a few pieces of equipment to get clear, sharp photos. First of all, it is extremely important to have a stable tripod coupled with a remote control, which will allow you to shoot hands-free and avoid any accidental shake.
It's also good to work with a wide-angle lens, mostly because in the city there are limitations on vantage points and where you can fit, so something like 18mm or 24mm is ideal and will allow you to fit the entire view in front of you. entirely. It is also worth attaching a lens hood, which is usually used in very bright conditions, but in the city there is a huge variety of light sources, which can lead to unwanted reflections.

What is the subject?
In a city space at night, anything that emits light can be considered a potential subject. First, you can take a photo office buildings, hotels, shop windows and architecture in general. Don't forget to consider architectural details just because it's dark.
Through the use of a long shutter speed, these subtleties can be revealed in a way that is not necessarily the same as in daylight. Street lights will also help you, providing additional illumination in any situation.

Catch the moving lights
In addition to stationary light sources, there are great amount moving ones, which can result in extremely attractive images. Cars, trains, buses, trams and Ferris wheels can be used to capture long exposure light trails.
Use shutter priority mode to choose the appropriate amount of time for a given light source to pass through the frame, resulting in a light trail in the image. One useful technique is to count required time before shooting, to know what shutter speed to choose, keeping in mind that there may be some variation depending on the speed of the light source.
With all the talk about shutter speed, it's easy to forget about other elements of a photo, such as composition. Once you have everything set up the way you want, think about the placement of elements in the frame, are the light trails leading into or through the frame? Think about the surrounding architecture that frames your lights and how you can use the rule of thirds.

Playing with the zoom
There are also a couple of fun techniques you can try to improve your city night shots. For this one you need a standard zoom lens, just select your light source and make sure the lens is at its farthest position.
Press the shutter button, and while exposure continues, move the zoom a full turn, ending as close as possible to the moment the shutter closes. This should give you the effect of light rushing towards the viewer. Now try doing this in the opposite direction, starting as close as possible and gradually moving away.

Panoramas of the night city
Creating a great panorama depends on finding a good vantage point, so head a little further from the city center to find a high point from which you can fully see the city skyline. It is definitely preferable to find a vantage point in daylight and wait until it gets dark to avoid searching in the dark.
Look for a strong composition that includes differences in building heights and an element of interest throughout the frame. Experiment with exposure times to get the correct exposure to ensure all light sources are clearly visible, highlighting the outlines of buildings.

Now you!
So now it's your turn. There are a huge number of methods and options for working at night, especially given the variety of urban views to choose from. Once you've photographed the cities you're already familiar with, it's worth exploring the vast selection of subjects in your new territory.
I find that I have much more visual awareness when working in terrain I don't yet know. I'm drawn to details and features that I would otherwise ignore if I were just working on the familiar streets of my hometown.

Many thanks to Mike fromManchester Photographicfor the inspiration to write this article.
Have you ever wondered how to take pictures at night, how to get a beautiful shot in the dark? And even without a tripod? If so, then this article is for you! I hope that you will find answers to all your questions in it!
Lights big city, lunar sky, Milky Way... Surely you have seen them, and if you are passionate about photography, then you probably had a desire to photograph all this night beauty!
But you don’t always have a tripod with you, and shutter speeds at night are long... using a flash is not always advisable...
Of course, the most correct decision if you are planning to take photographs at night is to shoot by placing the camera on a tripod. Let's look at this option for now. When photographing from a tripod, I recommend setting all the settings manually so that the camera’s automation is not “deceived,” for example, by the bright headlights of a passing car. You can set, for example, a shutter speed of a whole second, or even half a minute + set the minimum possible sensitivity of the matrix - so that the photo is obtained with a minimum of “noise” (you can not have the lowest ISO, any one that does not have strong “noise” will do). . The aperture size should also be reduced, for example, F9 or F22, then point light sources - for example, street lighting lamps - will turn into beautiful stars. An example is the following photo:
© Anton Karpin. Photographed with a DSLR, F/22, ISO - 100, shutter speed - 30s.
You can also use exposure bracketing. This is especially true if the scene is very contrasty and the dynamic range of the camera matrix is not enough. Then, upon completion of the shooting, it will be possible to combine the resulting frames and get a photograph - well exposed in all parts - both light and dark. This is called HDR - high dynamic range photography. Here is an example of a similar photograph taken by me on the slope of the Pulkovo Heights - on the horizon - St. Petersburg:

© Anton Karpin.
An additional benefit of a tripod is that it also makes it much easier to photograph panoramas... and they can be really pretty at night too!

© Anton Karpin.
However, the situation changes somewhat if there are people in the frame whose images should not be “smeared” across the frame. In this case, you have to sacrifice a closed aperture - open it wider (for example, F5.6), and set the sensitivity of the matrix higher. For example - ISO 800, or even 1600, or even more - it really depends on the capabilities of your camera, then noise reduction is inevitable, and a decrease in the quality of the photo... but it’s better than nothing - isn’t it? However, everything in this case is aimed at reducing the shutter speed to the minimum possible, at which people will not “blur”...
When photographing people at night, a flash is also sometimes used, but when using a flash, the background is most often “lost” and underexposed. The background can be saved - again by opening the aperture as much as possible and setting high sensitivity, so there is no universal recipe in this matter!
How to take photographs in the dark without a tripod?
If you are on a trip and cannot take a tripod, then most often you can do without it.
Our first assistants in photographing without a tripod will be stones, stumps, benches - anything you can put the camera on. In this case, a certain amount of ingenuity is required in the matter of fixing the camera. By the way, some photographers recommend taking a bag of buckwheat or rice with you in such cases - on which you can always put the camera.
Here is a photo I took in Sochi, putting a handful of sea pebbles on the camera (I used a Canon 40D DSLR, but you can use the popular Canon 600D, 550D, Nikon D3100 or D5100 or any other camera):
 How to take photographs at night without a tripod, using available tools and a DSLR camera .
© Anton Karpin. ISO = 200.
The same result can be obtained when using a mirrorless camera or any point-and-shoot camera (compact) in which you can set a sufficient shutter speed - except that there may be more noise.
But what to do if such support is not available, and the Sun has long gone below the horizon? In such a situation, it is recommended that the photographer himself lean on something reliable - for example, a lamppost or a tree, hold his breath and shoot... In this case, you may need to take a lot of shots - until one of them turns out to be really clear and not blurry. Yes, night photography in this case, it requires composure and patience from the photographer.
Recently I tried to take photographs at night from a pleasure boat moving along the Volga, and strangely enough, it also worked out... quite acceptable for posting photos, for example, on VKontakte. Here is an example of such a photo:

© Anton Karpin. F/4.5, ISO -800, shutter speed - 1/40s.
If the options proposed in this article are for some reason not acceptable to you, I recommend finding the “Night” shooting mode on your camera - perhaps with its help you can also achieve good results!
And here's another... One good thing video- Also dedicated to how to photograph at night:
I'm waiting for your night photos in the comments;)
How to take pictures at night? After all, photography is light! And at night there is very little of it. Night photography is not an easy task. It can have many approaches depending on what kind of story we are going to shoot. Now we will look at an example of shooting a night city landscape.
NIKON D810 / 18.0-35.0 mm f/3.5-4.5 SETTINGS: ISO 64, F16, 20 s, 35.0 mm equiv.
Shooting at night in the city is interesting for many reasons. Firstly, a variety of illumination will highlight seemingly familiar views in a very unusual way. Secondly, shooting in a city at night is accessible to everyone: you don’t have to travel somewhere very far to do this, as is the case with shooting a natural landscape. It will be enough to drive to the center of any large city: there will probably be a lot of interesting places for shooting. If you shoot in some ordinary alley in a residential area, the shot most likely will not be interesting.
I live in Moscow and chose to shoot a classic view of the Kremlin walls from the Bolshoi Moskvoretsky Bridge.
It is important to choose the right time for shooting. Oddly enough, the best “night” shots are taken not in the dead of night, but at dusk, when the city lights just turn on, and the colors of the evening still remain in the sky. Or vice versa in the morning, when the sun is about to rise. Otherwise, if we shoot late at night, we will have a completely black sky in the picture. It's the choice suitable place, angle and time of filming - the most difficult and most creative stage in creating a night landscape. After all, the key to further shooting success is only a matter of technique.
What equipment is needed to shoot a night cityscape?
To shoot this shot I needed the following equipment:
Tripod. I put it in first place, since it will be the key factor for obtaining a high-quality photo. Everyone knows what will happen if you shoot handheld in poor lighting: the frame will either be blurred or drown in digital noise when using high sensitivity. By placing the device on a tripod, we can use the minimum ISO, obtaining frames of ideal quality. Instead of a tripod, you can use some supports found on the ground: parapets, curbs, etc. However, such supports will not allow you to securely fix the device, and it will not be possible to accurately frame the frame.
A camera that allows you to take pictures manual modes. Of course, it is best suited for our purposes reflex camera. I used my favorite Nikon D810: it gives excellent picture quality and is easy to use. The lens I chose for shooting was Nikon 18-35mm f/3.5-4.5G ED AF-S Nikkor. It has quite “wide” focal lengths, moreover, it has surprisingly low weight (compensates for the heavy “carcass”) and excellent picture quality. However, you can use any device on which you can adjust the exposure yourself. I usually use M mode when shooting at night: in city night conditions, automatic exposure metering will not always work accurately. But you can also try shooting in semi-automatic modes, for example in shutter priority mode - “S”. Why “S”? Why is endurance so important? I'll talk about this below.
How to set up your camera for night photography?
When photographing cities at night, it is important to pay attention to each shooting parameter. ISO should be minimal. Most cameras have a minimum light sensitivity of ISO 100.
The most interesting exposure parameter from a creative point of view is shutter speed. You can “play” with it when shooting. I set the shutter speed to 30 seconds so that the cars passing under the bridge would blur into traffic, leaving only headlight marks behind. Such long red and white lines look good in the picture and emphasize the dynamics. By the way, here again the minimum ISO will be useful to us: it will allow us to properly lengthen the shutter speed.
Let's look at some more examples taken at different shutter speeds and ISO.


So, we sorted out photosensitivity and shutter speed. What to do with the diaphragm? Most likely to take enough long exposure, the aperture will have to be covered. In addition, it is useful to close the aperture if the photo contains some foreground close to the camera. Then a closed aperture will help increase the depth of field and sharpen both the front and background. For beginners, we can advise you to put the aperture under automatic control, shooting in S mode. In order to simplify your task. Please note: to avoid shaking the camera on the tripod when you press the shutter button, it is best to set up a timer release. You can also use the remote control.
White balance when shooting at night should be adjusted based on what lights illuminate your landscape. Most likely, these will be flashlights with yellow light. Then you should use the “incandescent lamp” preset. However, you may also come across “green” lanterns with fluorescent lamps. And even better - immediately shoot in RAW and bring the white balance to ideal during processing without any loss in image quality.