Hello! We continue to study video editing for beginners, and today I will show you how to insert text in sony vegas pro 13 over a video or picture. It's no secret that in quite a few cases some kind of text insertion is simply necessary. Today we will consider 2 ways: internal and external.
How to insert text with built-in tools
Of course, such a powerful video editing program could not help but have its own text input function in its arsenal. Moreover, there are several such functions in the program. Let's consider each separately.
simple lettering
If you need to add a regular inscription to the video that does not move, then enter the program and select the "Media Generations" tab in the media window. You will have a new window that will display various linings, backgrounds and texts. In this case, select "(Legacy) Text", after which you will see a lot of various kinds with different effects.
On each of the views it will be written how it differs from the others "Bend", "Clear contour", etc. Click on any of these templates with the left mouse button and drag it to the tracks area or add it as a fragment to any video track. Don't forget to look at the background. If gray squares are visible behind the letters, this means that the background is transparent, but it can be filled. More on this later. Just first make sure that the picture is on top of the video or image on the track, otherwise the inscription simply will not be displayed. Make sure that the path with the inscription is higher.

After that, the fragment will be automatically inserted and the settings for this piece will open in a separate window. This is where we will have to do some magic and work with the tabs to achieve the desired result.

When you have finished processing the inscription in Sony Vegas pro, then just close the window, and all settings are saved in real time. But if suddenly, you realize that you want to change something, then click on the special icon on the fragment in the form of a film strip, after which the settings window will open again.

If the duration of the text display is not enough for you, then simply drag the edge of the track fragment to any distance.
Animated text in sony vegas
But if you want to insert text into Sony Vegas so that it is dynamic and lively, then it is best to choose special animated templates that are also built into the editor in the same way.

The settings here work a little differently than we did with you earlier.

You will watch all the changes in real time right in the preview window. Only for this you will need to put the cursor in the right place on the track so that you can see the text.
External use of text in sony vegas
Unfortunately, it is not always possible to insert beautiful text in sony vegas pro in 13 internal ways so that it suits you in all respects. In the end, you can have your own or a designer and brand solution, where standard tools will look bad, to put it mildly. But there is no trouble. We can prepare the text in advance in any text or photo editor, such as Photoshop, and then save it in PNG format.

And then, insert the Photoshopped inscription into the program and work directly with it. Naturally, it will not fit as you need, so you will have to adjust the inscription yourself. The familiar Pan / Crop function that we used when .
If you want to learn more about Photoshop in order to learn how to cool photos, work with images and text, then be sure to check out these video tutorials. This is one of the best Photoshop tutorials I've seen.
Additional effects when working with text in Sony Vegas
You can also zoom in or out on the inscription, move it to the right, left, up or down. You can even rotate it and make animated effects. To do this, you just need to set the starting point of the text position (anchor) in the "Pan / Crop" mode, and then move it to another place, remembering to put the cursor at the end point.

Now, you can close the crop window and see what you got. It should be that the text appears on the left side and within 5 seconds goes off the screen on the right side. The fewer seconds you have allocated for this business, the faster the text will leave.
And if you want the inscription to fade in and out smoothly, then you need to do the following: slightly pull the corners of the fragment with the inscription so that a white arc forms on it.
The arc at the beginning will be responsible for the appearance of the text, and the arc on the right for its attenuation. Despite the fact that the effect is very simple, it always looks advantageous.

And by the way, you can impose on this very arc. To do this, select it in the Transitions tab, which is located in the media window, and simply drag it to the transition arc zone.

Now see for yourself what you can do. Very simple and very cool.

Outcome
Now, you have learned how to paste text into Sony Vegas Pro 13 in several ways, and you should not have any problems to bring it to life. It doesn't matter what you use the inscription for (for titles, copyright, title, hints, etc.), the main thing is that with the text any video will look more advantageous.
But if you want to master video editing at a higher level and make incredibly awesome videos and clips, then I recommend that you study Premiere Pro course. The course is really just cool, and the training is structured in such a way that even someone who has never even worked in video editors can master it. Premiere Pro not only makes videos for blogs, but also edits real Hollywood blockbusters. So I strongly recommend to study the program. It's just a bomb.
Well, on this I say goodbye to you. I hope that you liked my article. Do not forget to subscribe to my blog and public in in social networks. I'm waiting for you again. Good luck to you. Bye Bye!
Sincerely, Dmitry Kostin.
In another article, which is devoted to the basic principles of working in the program Sony Vegas, we will look at the process of applying text over a video. This is done simply and quickly, so without too much "chatter" we proceed to the implementation of the task.
To begin with, we place our video on the "timeline" and immediately create a new video track: right-click on the current track and select from the menu that appears "Insert video track"(fig.1)
Fig.1
After creating the track (it appeared above the track with the video), we need to add the text itself, which will be displayed on top of the selected video. To do this, go to "Data Generator" => "Text" => Soft Shadow(Fig. 2) and simply drag it to the track we just created.
I mostly choose this kind of generated text (soft shadow), since it's already adorned with a bit of a shadow (although this can easily be done with "Video Data Generator"), but you can choose any other. True, for the task in this article, only the type of text without a background is suitable (on the previews, these types of generated text have a background in the form of a kind of chessboard).
When you have done all the above steps, you should open a window"Video Data Generator", as well as when the time line is drawn on the segment with text that is placed on the track, tex T should be displayed in the preview windowvideo, tobezh with accuracy as in (Fig. 2)
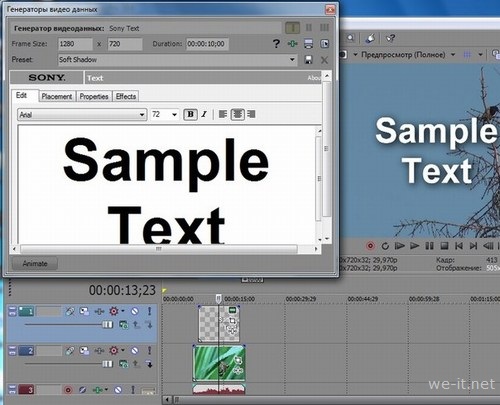
Fig.2
Now let's immediately write the text we need. To do this, simply make the “Video Data Generator” active and enter your text there, I have this: "Text by site" (fig.3)
Learn more about editing text in Sony Vegas you can (highly recommend!)

Fig.3
In order to revisit "Video Data Generator" after you closed it, you need to click on the button on the thumbnail of the generated text, which is located on the "timeline" (Fig. 4)
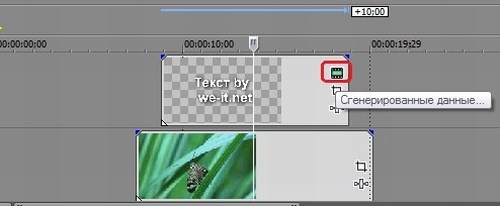
Fig.4
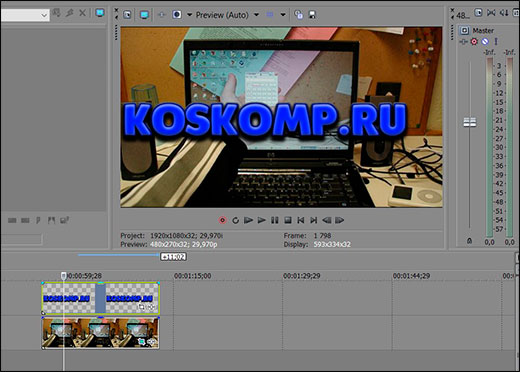
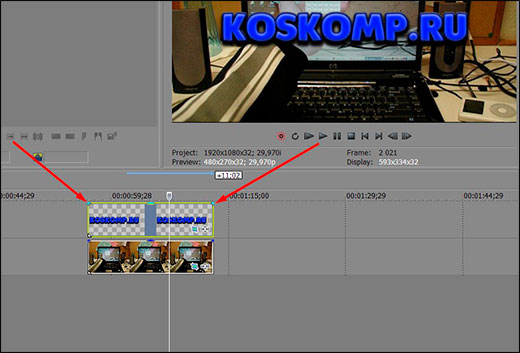
I want to remind you once again that in order for your text to be visible on top of the video, it must, accordingly, be located above the video track, as shown in the screenshot above.
So we got acquainted with the basic process of overlaying text over video in Sony Vegas. Also, in order to achieve the results you need, I strongly (once again) recommend that you familiarize yourself with this article, here the principle of editing the generated text is described in detail, all in the same Sony Vegas.
Good luck and success in creating your video projects :)
Gives us great opportunities. Where to start?
We'll start with the Media Generators window. There are two groups with titles: scrollable (Credit Roll) and static text (Text). We will work with the second group. We go there and see several templates to choose from. You can choose the right one and simply drag it to the Timeline to the place you need. Or you can read the article and create your own template. Let's put the simplest template on the video track. This can be done by double-clicking on the first sample in the Media Generators window, or by selecting Insert Text Media from the context menu of the video track.
We have a window Video Media Generators. There we will configure the text parameters.

On the first tab (Edit) we have the usual text editor, nothing complicated: enter the text itself, choose the font style, size, alignment, and so on. Let's write something, choose a font. the result is immediately displayed in the Preview window.
Let's immediately turn to the key points (where without them!). We can for example make text appear word by word. To do this, create a key point by moving the cursor to it and write the word "work". Next, create a second key point and write the letter "c" on the next line. Well, for the third point, the word "text" remains.

Let's go to the second tab. Placement. Here we set the position of the text in the frame.

By holding the left mouse button, you can simply place the text in the desired location of the frame. You can also set this location in the Text Placement drop-down list. Let's pay attention to the red rectangle displayed on the frame diagram. This rectangle shows the text safe area. There are times when the screen parameters do not match the parameters of your video and part of the frame is simply not displayed. Therefore, a safe zone is set.
Here we can also use key points and give the text an unusual appearance. (we will remove the old settings, leave only the text) On the first key point, completely hide the text behind the left border of the frame. for the second, put the text in the middle and see the result. Our text "leaves" from the left border of the frame.

On the third tab, color options are set. We can also change the properties of the text here. Space between letters (Tracking), scale (Scaling) and line spacing (Leading).

Let's remove the previous keyframe settings again and try to create something new. For example, for the first key point, set the Scaling parameter to 0, and for the second point, set the value to 1. We look at the result.

On the Effects tab, we can give the text some additional property, such as a shadow (Shadow). To do this, in the shadow box, check the boxes and set the settings (tilt angle, blur, color). The same with the stroke (Outline) - put a tick, set the settings (color, blur and thickness). And the last parameter is distortion (Deformation). Put a tick, select the type of deformation, and the value.

You can also draw keypoints for animation in . And do something like this:

Let's look at another option for giving color to text. To do this, reset the old settings again and create another video track.
we will put some kind of gradient or texture on it, placing it under the text.
Well, friends, in this article we will talk about how to create video tracks in Sony Vegas and add the necessary text or captions to them.
I think that this article will be useful to all of you, because when creating your videos, you will come across the Text tool quite often.
Therefore, I propose now to deal with this issue in detail.
How to add text to sony vegas
In order to add the necessary text inside Sony Vegas, you first need to create a separate video track for it. This is done as follows:
After the track is displayed on , we go to the tab "Data Generators" (« MediaGenerators”) and select the item in it « text"

Before our eyes, there are several so-called text blanks (presets), from which we will choose the most suitable for us and, having captured it with the left mouse button, we will drag it to the video track we recently created.
By the way, among these text blanks there are blanks with both a colored background and a transparent one, so you can choose the one that suits you.
Although, in general, any of them can be customized.
For clarity, let's drag a blank with white text on a black background onto the video track. And immediately a window for editing the text opens:

And in this window we can:
- On the tab " Edit» change the text itself, specify the desired font for it, size and position of the text (I wrote the text “Hello guys!” Here and set the necessary settings for it).
- On the tab " Placement» You can specify where exactly the text should be located, say at the bottom or in the upper right corner.
- Well, in the tabs " Properties" And " effects» You can "tweak" the settings you already need: change the color of the text and background or remove the background altogether, change the distance between letters, text scale, apply a shadow, stroke, etc.
After the performed manipulations, to apply the text settings, simply close this window, because. everything you configure inside it is saved automatically.
If, after viewing the result, something suddenly did not suit you, then it will not be difficult for you to make the necessary adjustments, you just need to click on the frame image (green) located on the file with the text.

How to make titles in sony vegas
To create captions for your video, all in the same tab "Data Generators" (« MediaGenerators”) select “ CreditRoll»

Where we again see several options for presets. Moreover, by moving the mouse cursor over any of them, we can see how our titles will look.

To the right of the text, you can also make the necessary adjustments in the same way: letter spacing, text position, font, background color, etc.
At the end of making changes, just close this window and all settings will be automatically applied.
Watch the video on how to add text on video in Sony Vegas 13
I also recommend that you watch a video on how to make video captions in Vegas Pro 13:
Well, that's all, my friends, this is the end of my article. Today we learned how to create text and captions in Sony Vegas Pro and I congratulate you on another small victory!
Ask questions in the comments below the article if something else is not clear.
Practice, experiment, create!
Your Victoria