04/02 7540
When opening your online store, be sure to take pictures of the goods. In particular, this applies to sellers who deal in jewelry and bijouterie. As a rule, such work is invited professional photographers, because they already know how to properly set the light so that there are no shadows. After reading this article from Photo search you will also know these little useful secrets and you can position yourself as a professional.
First of all, you need to equip your place. When shooting any decoration, you need to keep an eye on it. appearance in the photo, so that I would like to buy such a product. The photographer himself must evaluate his photo from the position of the buyer, then the work will be fast and good. The best shots are taken in a lightbox. Then the object is illuminated from all sides and the pebbles stand out well.

If you don't have a professional lightbox, you can make your own. There should be 4 walls and all of them should be with windows that are sealed with white paper. Or you can immediately take whatman paper and make a cube out of it. Install lamps on all sides to help get rid of shadows. And these white sheets will make the light more diffused, and there will be no obvious points of light on the product. The background is best done in white. That is, leave sheets of paper. If you want to make the picture a little brighter, then by no means make it defiant. Patterns and drawings are allowed, but if they are not too bright, so as not to interrupt the subject itself.


What camera accessories can get you a good shot? To work with bijouterie and jewelry, macro lenses and macro rings are used. They allow you to take a picture from a minimum distance and with good clarity. To take sharper photos when shooting macro, cover the lens.

While working, try to photograph the object from all sides. It is necessary that both the fittings and the features of the accessory, and all the main details, be visible. Take 4-5 pictures of each product, then you can make a collage of them, and the buyer will immediately see all the best sides of the item. Don't be afraid to change the position of the light. So you can achieve the perfect shot and please the customer.

After the footage is subject to processing. To make you have a little less work later, bring your accessories to perfect condition right away. Remove all fingerprints and try to get rid of large scratches, otherwise they will look very defiant. Of course, you can’t do without processing at all, because there are always invisible scratches on the goods and small defects are possible. To get rid of everything and give out the perfect photo, use the “clone” tool and “healing brush” in Photoshop.

We try for you 24 hours a day and thank you for every repost!
Advertisers know that the first thing people pay attention to is an image. And hand-made is no exception: even if you have created a masterpiece, you won't be able to sell it without good illustrations. Six simple rules will help you learn how to make clear, bright and beautiful pictures their products.
1. Mandatory set.
A window, a sheet of paper (this is the background for your product), daylight, a homemade reflector (cardboard covered with foil), a table or a large window sill are all you need in order to take crisp, clear and well-lit photos.
 1
1
If the thing is not lying, but standing, you will need two sheets of whatman paper - for a horizontal and vertical background. In addition, it makes sense to get a tripod for the camera: it will be very disappointing if a hand trembling at the wrong time ruins a carefully built and generally good shot.
2. The background rule.
As a background, you can use an ordinary white sheet of drawing paper. It's not dogma, it's just White background is considered universal by photographers. In principle, any muted, pastel colors are suitable - grayish, bluish, beige, etc.
Too bright colors, of course, can also be used, but, as a rule, they only distract attention from the thing that you are “presenting”. The background has every right to contrast with the subject, it is important to ensure that it does not draw attention to itself, the subject should remain the main thing in the frame.
3. Shooting mode.
Small items, such as accessories and jewelry, are best suited for macro mode: in this case, the background is as blurry as possible, and the subject, on the contrary, is clear and voluminous. major works are usually filmed normally.
 2
2
Before pressing the button, set the "white balance". In other words, you need to select a lighting mode (cloudy, sunny, or electric bulb), otherwise the photos may come out yellowish, and this shade will kill all the beauty you created. Check if the built-in flash is disabled, it can simply ruin the entire photo session.
4. History in detail.
How do you usually behave in the store before buying the item you like? That's right, carefully examine it from all sides! Customers of an online store are just as interested in details.
 3
3
Take photos of the product from different angles - give potential buyers the opportunity to see the buttons, fringe, embroidery, pockets, etc. And be sure to show the wrong side: are the seams neatly processed, what does the lining look like? V big deal there are no trifles: the portfolio of each item should be as detailed as possible.
5. From different angles.
Static "still life" on a light background - it's good and right, but not always enough. The buyer must see how the product looks and changes during use. It is better to show clothes on a model or on a mannequin.
 4
4
The bag must be removed in two versions: firstly, hanging on the arm, and secondly, open with a standard set - passport, wallet, powder box inside. So you will create the correct idea of the size and volume of the product. It is better to photograph jewelry on a person, a tablecloth on a table, a blanket on a bed, etc.
6. Photo processing.
Yes, you can’t do without mastering Photoshop, otherwise you simply won’t be able to achieve the desired wow effect. Even the most successful shots will probably require a little refinement - color correction, cropping and removal of dust particles or crumbs that accidentally fell into the frame.
 5
5
In addition, before posting photos on the site, do not forget to mark each of them with a link logo with the address and name of your blog. Firstly, this is not the worst advertising, and secondly, the logo will help protect your photos from "unauthorized" use.
How not to do it.
- Photograph objects against the light.
Use too colorful background.
To shoot your products "in the interior" of everyday everyday chaos, against the background of dirty windows or peeled wallpaper.
Get too carried away with accessories and embellishments. A potential buyer must understand what exactly he is buying - this teddy bear or flower beads laid out around him.
Decorate finished photos with hearts, suns and other “funny pictures”.
Cover models' faces or cut off their heads. If you want to demonstrate how the product looks on the figure, invite someone who does not mind “light up” to shoot. Headless photos often look off-putting, which means there's a good chance buyers will simply pass by your beautiful work.
Information from the site: http://caramelina.livejournal.com
1. Preparation
Shooting things is different from shooting, say, a portrait. The thing does not spin like a person, and does not try to check what you have captured (along the way, erasing the frames you didn’t like). It can be placed as you like, you can highlight it favorably. Therefore, there is no need to rush. Hasty usually does twice, but we will do it in one go.
The main thing to remember is that shooting beautifully is easy. Look at the thing, decide for yourself what you like about it and why. Texture? Color? Feeling? And only then arm yourself with a camera.
Let's start from the very beginning. Just as scenery plays an important role in a performance, so a good background for a thing. It is good if it is monophonic (or with a small pale pattern). When choosing a color, try to create a contrast between the background and the thing. For example, thermal (warm color of a thing, cold background) or tone (light thing, dark background). Why exactly? We photograph a small object, the less detail there is outside this object, the more attention will be paid to it.
I don't have a studio, I photograph at home. To create an even background, I use several large sheets of pastel paper. Colors: gray, blue, brown.
3. Staging
The sheet is fixed above the table. Part of it is reclining on the tabletop, pressed down on both sides by something quite heavy. It doesn’t matter how it is fixed, it doesn’t matter what is on your sides, because this will not be in the frame! Only the center will get into the frame where we will put our thing. 
4. Light
The next thing to take care of after the background is the light. It can be bright or dim, diffused or direct, it depends on many factors. I usually shoot on the dining table, daylight falls on the left from the open window.
What if it's evening outside? Or is it so overcast that everything comes out gray? It doesn't matter, I use lamps. You can daylight, you can ordinary incandescent.
In principle, this could be stopped, but there is one more interesting thing - a reflector. If the light falls from the left, then shadows form on the right side. And the brighter the light, the darker the shadow. Therefore, on the right, I put either a sheet of white paper or foil, which will be the reflector. The light will reach it and return at an angle, highlighting the shadow along the way.
The effect of the reflector is not too striking, but if you try to substitute a sheet of paper and then remove it, you can immediately see how everything changes. 
There are objects that do not need tricky angles, they just need a view from above. In this case, it will be even easier for you: just a sheet of paper laid on the table can become the background. 
Don't forget the reflector! 

Now we are all set to start taking pictures.
5. Camera setup
This part reminds me of the action of the pilot before the takeoff of the plane. So:
Depth of field
The first thing we do is set the mode in which we will shoot. For cups and other little things, I use
macro photography (or aperture priority if I shoot with a DSLR). What does she give? Macro photography is characterized by the fact that photographs are obtained with different depths of field. That is, the foreground is clear, and the background is blurry. What do we have in the background? That's right, background. And the more blurry it is, the better for us. And in front of the thing that we are shooting, it will turn out clear.
On my Nikon soap box, the macro selection mode is hidden inside and not too obvious. I'm guessing that it might be the same for you. Therefore, climb through the camera settings, you need to find
the icon of a flower in a pot - this just means macro photography.
In these frames, one drawing is in focus and the other is out of focus. It turns out an interesting effect, but it achieves just macro photography. 
Now check if the flash is disabled. Why? Very simply: in small soapboxes, the flash is made so terribly that its flashes will ruin for you all the light that we just so carefully exposed. Blocking with a finger or a sheet of paper will not help.
In general, a flash is a useful thing, but I only saw normal ones on DSLRs, and even then you need to be able to use them. And since the article is designed for owners of soap dishes, let's just turn it off.
Set the white balance. Depending on the light used, we select the lighting mode sunny: light, cloudy or incandescent. This is necessary so that the photo does not acquire an undesirable shade. (For example, if you shoot indoors with an ordinary light bulb, leaving the daylight mode, then the photo will have a pronounced yellow tint).
First: it will save you from blurry frames.
Secondly: you can fix the camera and not hold it in your hands.
Thirdly: a tripod is absolutely indispensable when you need to remove a vase from different sides. It is enough to set everything up once and then only turn the object, and press the shutter.
6. Shooting
Many articles have been written about the rules for creating photographs. Sometimes these rules conflict with each other. The main thing is not to take them literally and trust your own instincts. If you make beautiful things, then you will definitely have the ability to photograph them.
Sometimes, in order not to invent a bicycle, it is worth looking at how others take pictures. Just do not copy blindly, try to analyze why it was filmed that way. What in the picture makes him look at it?
For example, I often take several shots to show a thing from different points of view. 
I shoot as a whole and separately in small pieces to show especially successful parts of the picture. I love when the light falls textured.
If the subject in the frame is partially placed, I carefully follow exactly where the frame will be cropped.
Sometimes I deliberately tilt the camera so that the thing lies diagonally in the frame.
Think, if you take off jewelry, maybe they will look advantageous on the model, like clothes, you can put flowers in a vase, and a photo in a frame.
Last but not least, don't be afraid to take lots of pictures. Typically, over time, good shots per session increases, and the bad ones decrease, because you get experience, your own achievements, techniques.
If you need to shoot from above, then the tripod moves so that the camera looks vertically down, and what you are shooting appears in the frame. . Perhaps for this you will have to put the thing on the floor along with the background (if the tripod is small and can only gain sufficient height by standing on the table). Or everything is on the table if the tripod is large. Nothing that the height is large, because there is a zoom.
One more point: let's say the conditions are such that you cannot use a tripod. Maybe you don’t have it corny, and are not going to buy it yet. How to increase the number of clear shots?
First: first, press the shutter button halfway (the camera will focus), then to the end. During focusing, a slight hand shake is not scary. And at the final descent, half the time will pass, your hand will simply not have time to twitch.
Second: do it on the exhale (or inhale), like a true sniper
How to photograph your work. Advice to residents of LIRU.“To become a real photographer,
you have to learn to look with the eyes of the soul,
for real camera lenses
It's heart and soul." Jozef Karsha
That is why some LIRU residents have an innate talent to take high-quality pictures of any objects, and for many talented needlewomen creating their own portfolio is a big problem :-)
This post is for "non-professional dummies" who want to adequately show their products on the Internet
About creating a frame composition using the golden section rule
Undoubtedly, the availability of expensive and high-quality equipment greatly contributes to the quality of images. But knowing some subtleties, you can take wonderful photos, even with an ordinary "digital camera" and using only automatic mode.
1. Rule of Daytime Shooting- items must be removed during the "golden hours". It is appropriate in any season: sunrises and sunset hours are filled with a special color, and the photos will come out very tender and conveying a unique transparency. To get started, try attaching a fallen autumn maple leaf to the window glass, and when the leaf begins to "shine" in the sun, take a picture of it close-up or take a macro photo

And then try to take a picture of a small object - your craft: knitting, jewelry, a vase, a jewelry box, hand-made soap, or a flower made of palasty fabric, placing the subject away from the background and picking up the aperture close to the maximum open hole.
Find a window at home that gives good light that you can control, set up a table there - your studio is almost ready. The foam sheet can be the base of the stage. Add some DIY reflectors and small mirrors.
2. Rule for shooting small objects: turn off the flash!
The easiest way to shoot a small subject is to step back and zoom in on the subject to blur the background:

To shoot macro, landscapes, and much else, where blur is not required, but detail and sharpness are needed, the aperture is selected close to the values 8-16 . "But there is no diaphragm in my fotik!" Switch to manual mode shooting! It is on all soap dishes and is often indicated by the letter "M" - manual. Further options - in most cases it is possible to select and set the aperture and shutter speed parameters, directly by the number F8.0. ISO parameter - on soap dishes set to value "100" - if you do more - about 400 there will be an overexposed photograph, too saturated with light.
shooting modes. Green mode indispensable for beginners, as well as when you need to quickly take a picture without fiddling with the settings. This mode is available in almost all digital cameras, and in cheap soap dishes it is, in fact, the only one for shooting :)
P - semi-automatic sometimes referred to as "software" The same as green - everything is on the machine, but you can change some settings (focus points, white balance, ISO, flash). S - shutter priority Shutter-priority semi-automatic mode. In some cameras it is indicated by (Tv). You set the shutter speed, the camera sets the aperture for you! A - aperture priority Aperture-priority semi-automatic mode. In some cameras it is indicated by (Av). You set the aperture, the camera sets the shutter speed for you! M - fully manual The photographer is in complete control of the entire shooting process. You turn on the camera yourself and ... do everything else for him :) Mode selection wheel. Mode selected photo viewing, a little higher - green mode.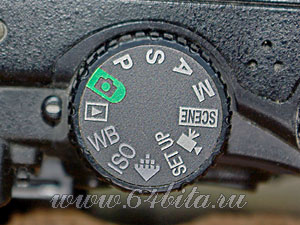
Clockwise: green mode, PSAM [discussed in the text above], SCENE (scene, or custom mode [discussed below]), movie shooting, SETUP (settings), quality ⁄ photo size, ISO (light sensitivity), WB (white balance) , view pictures.
Of course, the wheel may differ in different cameras (it simply doesn’t exist in inexpensive cameras), but everyone has a green mode and viewing pictures, even if there is no wheel :).The machine will select the correct (but average!) shutter speed and aperture values. But dIn order to "tell" the camera what you need, there are just other modes, which, unlike green, are usually called creative, or manual. Of these, the most useful are "shutter priority" and "aperture priority"- interconnected. Shutter priority you make it shorter (for example, so that there is no blurring) - and then the corresponding aperture value is set by the camera's automaton.Aperture priority (for quick setting and control of depth of field, shutter speed is also visible, which means it will be controlled by you) Some cameras have a "sensitivity priority" mode - you set the ISO - the camera selects the shutter speed and aperture ...Modes "Landscape", "portrait", " night landscape”, “museum”, “sport” and masses of similar ones are in almost every camera: the essence of such modes comes down to an elementary combination of shutter speeds and apertures. Even without being professionals, you yourself are able to set a fast shutter speed instead of the “sport” mode, open the aperture as much as possible instead of the “portrait” or “night landscape” mode (without a tripod), and, of course, turn off the flash when shooting in a museum

3. The rule of preparing a photo studio and lighting for those who like to shoot at night: the more time you take to prepare for shooting, the easier it will be to take a series of shots with the light already set. Owners of soapboxes and automatic digital cameras should know the theory of light!
For home photography of small objects, you don’t need a lot of equipment, just 7 sheets of white paper (to make a box and reflectors), and 3 lamps - light sources.

You don't need complex setups to create nice photos. For starters, you can play with the light and small reflectors, you can use a mirror

To create your own mini-studio with the required shadowless lighting, a $ 200 studio umbrella with a halogen lamp from some Rekam can be replaced with a Chinese table lamp and a 100-watt reflector bulb (a conventional light bulb, firstly, gives a less concentrated luminous flux, and secondly, secondly, it heats the lampshade more strongly): we put two sheets under the lamps themselves and one under the central curved sheet in order to eliminate reflections and translucence of the yellow surface of the countertop.

There are an infinite number of schemes and designs that can give good photographs, you can use only a sheet and wrapping paper and still get good results, and if you are interested in not being limited to just a product in a photo, you can add something else to the frame in order to bring depth to the picture , tell a story. Pottery, stones, lace, a whimsical piece of wood will give many options for more intricate work.

The best way to control your lighting and exposure is to set your flashes to manual. . Experiment with the position of your flash and reflectors and you will find the right combination.

Using a simple dark background or mirror, you will create various pictures the same ring.advice from: photo.tutsplus.com
If film camera - see MK about shutter speeds and apertures link in the article
How to bring what has been done photo "to mind" in Photoshop watch wonderful MK from Valyusha-photographer here or here http://kracivo.ru/publ/27-1-0-48


Dear needlewomen, remember that in photography, as in painting and sculpture, you can only convey well what you understand well, and since you yourself are the author of the photographed object, you can find the best image for it!
And as Ansel Adams said Photography is more than a medium for factual communication of ideas. It is a creative art. GOOD LUCK!!!
When a beautiful piece of jewelry is created, it's hard not to show it off. in social networks or thematic blogs. And here it is important that the decoration looks impressive and attractive in the photo. How the picture turns out depends not only on the type of camera and its cost - even a simple digital camera able to take great pictures. In many ways, the quality of these images depends on the skill, skills and abilities of the photographer. Now everyone can take photos: got it, clicked it, got it. But in order to take a high-quality photo, you need to correctly set the settings. Take advantage of our tips!
1. It is better to set the camera manually. Try to avoid automatic mode. Open the instructions for the camera and study it, carefully read the paragraph about macro photography. Also study those places that talk about the effect of opening the aperture on blurring the background. The white balance needs to be adjusted depending on the lighting or tweaked later in the editor. Adjust the shutter speed depending on the background color - the darker the background, the slower the shutter speed.

2. When photographing jewelry, the most important thing is the choice of composition. To create a winning composition, you need to choose a suitable background, an attractive angle and proper lighting. To convey the texture of the product, you need to choose the shooting angle and a certain perspective. To highlight the decoration in the photo, use the spot focus.

3. Try backgrounds with flowers, different textures and other items that suit your products in style. Wonderful photos of jewelry are obtained on a wooden surface or a linen tablecloth. A monophonic background should either contrast with the main color of the product, or go tone-on-tone. Paper and velvet are also used as a background. If you want the stones to “play” on the decoration, use colored lamps. Lay the chain with a snake to get reflections.

4. You need to choose the right props. For this, busts and stands for jewelry are used. Create a collection of materials to serve as backgrounds or props. It can be stones, ceramics, even a fancy piece of wood. Use them to create interesting and intricate options. But know the measure in everything, do not overload the photo with unnecessary elements. The background and props should not divert attention from the subject itself and pull it towards themselves. Do not forget that the decoration is the center of attention, and the rest of the details are only auxiliary elements.

5. If you are not a professional and do not know how to work with artificial lighting, it is better to shoot in the light sunny day, i.e. in natural light. But direct and too bright sunlight is not suitable for photography, it is required scattered light. When using only natural light, it is better to take photos in the morning or evening.