Make Christmas tree toys from polymer clay- pure pleasure! Such creativity brings a lot of positive emotions, both during work and after it. Modeling has several advantages:
- no need for a large number of tools;
- you can sculpt anything;
- cheap and accessible material;
- minimum labor.

Let's prepare the workplace and get started
By and large, making such crafts is no different from modeling from plasticine. The only difference is that the toy will need to be baked so that the clay hardens and the craft retains its beauty. Before work you need to prepare the place. Put everything on the table necessary materials and tools:
- polymer clay;
- a little flour or talcum powder;
- small knife;
- paints;
- paper clips;
- threads
 We will sculpt figures from clay. We will need a knife for leveling the surface, as well as applying patterns, indentations, and so on. The paper clips will play the role of ears to which we will tie the thread. Talcum powder or flour perfectly prevents clay from sticking to your hands or table, which prevents modeling.
  We will paint the crafts after the clay hardens.
Wash your hands thoroughly before sculpting! Clean hands are the basic rule of sculpting. Not a single speck should get into the clay: this material sticks well, thereby it will “collect” all the debris. This also applies to the workplace, which should also be as clean as possible.

Let's start simple
 You need to start by making the simplest Christmas tree decorations from clay. For example, from ordinary balls. In addition to the items presented above, you will need a foam ball.
Please note that the balls cannot be made entirely of this material, as it will be impossible to bake them correctly. The maximum thickness of the clay should not exceed one centimeter! To make three-dimensional figures, use a “filling” from another material, for example, foil or foam.
If you don't have a foam ball, use foil. Make a small ball of foil, 3-4 centimeters in diameter.  Cover it with clay and roll it all in your palms to form an even ball. Take one small paperclip and stick it into the ball so that the ear sticks out slightly. Roll the ball in your palms again: the paperclip will be securely fixed in the clay. That's it, you can bake it (read the rules for baking in the next section).
 After firing, wait until it cools down. All that remains is to decorate our toy. It is better to apply the background color with spray paint. After it dries, you can paint with other colors (with a brush) anything you want: the symbol of the year, a snowflake, a snowman or Santa Claus. Insert thread into the eye of the paperclip and tie a loop. Beautiful Christmas ball self made ready, just like factory! In a short time you can make dozens of different toys, without much difficulty.
Learning to make various figures
 The simplest of them are flat toys. Here you will need a little clay and one little secret. Culinary cookie cutters, which we will literally use to stamp out the blanks. We put the clay on the table and begin to roll it out like dough. We take tin molds and “stamp” blanks: hearts, Christmas trees, diamonds, and so on.
 Insert paper clips or wire loops into the top parts. Place them on a baking sheet and bake like cookies. Further - only your imagination. You can glue something on them or draw something on them.
Do not forget to sprinkle flour or talc on your hands while sculpting. Without this, the clay will stick strongly to your fingers and the table, which will greatly complicate the making of the craft!
Complex (voluminous) Christmas tree decorations made of clay require a little more attention and perseverance.  You may need to sculpt individual parts from polymer clay, and only then assemble a whole figurine from them.
  For example, this snowflake. It is assembled from a base, many different petals and circles.
Or, for example, a figurine of some animal, where the body, head, paws and tail are sculpted separately, and only then assembled into one.  Here it is better to use matches as a reinforcing material.
A beautiful house from a fairy tale. 
A little patience and a cute owlet-miracle bird will appear in your hands. 

Firing rules
 It deserves even more attention compared to making Christmas tree decorations from clay with your own hands. Baking incorrectly can lead to very unpleasant consequences. Agree, it will be a shame if the craft you have been working on for a long time simply falls apart. Therefore, you need to adhere to the rules.
What to use for baking
 Earthenware plates, ceramic tiles or the simplest steel pan are used as firing utensils. Be sure to place baking parchment on the last one, and only the crafts on top. It is better to put several layers of paper so that the products do not become deformed.
What temperature is needed and for how long
 It depends on the craft itself, or rather, on its thickness and type of clay. Such information is always written on the packaging; be sure to read it before firing. Typically, the optimal temperature is 110-130 degrees Celsius.
It's best to use an oven thermometer to monitor the temperature.
When the craft is thin, for example, a flower or leaf, then required time will not exceed five to eight minutes.  For massive textures, sometimes it takes half an hour. If you decide to burn something bulky, use toothpicks, as shown in the photo. This is done so that the craft is evenly fired on all sides.
If fired incorrectly, toxic gas may be released from the clay! Monitor the temperature and time, be sure to follow the recommendations. Do not bake polymer clay crafts with food.
Dog made of polymer clay - video
Beautiful Christmas tree toys made of polymer clay - video
While the male half of our team was carefully choosing the green beauty that would decorate our editorial office, the girls were wondering how to express themselves in decorating the Christmas tree and making its decoration different from every year. Inspired by a trip to a Christmas tree factory, we decided that we should definitely try to make toys with our own hands. Unfortunately, there were no underground glassblowers among us, and we began to invent alternative options. There are quite a few of them, and we will tell you about each in detail.
I took clay toys into my area of responsibility. Polymer clay is very popular among craftsmen: it is easy to handle, like plasticine, and hard after drying, like ceramics.
Still, it was scary to master a new craft on your own. I remembered how I saw Irina Agladze’s wonderful jewelry crafts on the Internet: cute felted animals, charismatic cats and jewelry in the form of food, worthy of living in a roombox.


In general, I plucked up courage and asked to visit in order to learn from the experience. Irina answered me with the most cordial invitation and even promised to invite her friend-craftswoman Evgenia Shatko, so that we would have more sculpting hands and imaginative heads. Zhenya has her own language school, where Ira teaches along with her. As if the main characters of “Fathers and Sons”, the girls were divided into peculiar Slavs and Westerners-Anglophiles: Ira teaches English, and Zhenya teaches Serbian and Slovenian languages. And in his free time from lessons, Ira introduces Zhenya to needlework in its most varied forms.
Needless to say, I went to see the girls in anticipation of magic. But what awaited me in the rented apartment of Ira and her boyfriend turned out to be more wonderful than all my imagination. Firstly, before sculpting, Ira and Zhenya gave me cocoa and “Flight” cake (in my opinion, I have never lived such a sweet life). And secondly, at every step I came across some incredibly sweet and beautiful Irina handmade.

Waiting for me in the bathroom was a decoupage set with roses so realistic that I thought I could even smell them.

But Irina’s favorite person, Denis, began to decoupage the table in the room.

The panels on the kitchen wall are made using the same technique and are combined with delicate curtains and soft cushions for the bench. Ira confirmed my guesses that the curtains and pillows are also the fruits of her creativity, saying that in their family they do everything that can be done with their own hands, and that, in fact, she is not a big fan of the Provence style, but when she saw It was this magnificent jacquard, also sold at a big discount, that decided that the fate of the kitchen was determined in its direction. To each of my enthusiastic exclamations about her skill, Ira modestly answered: “Yes, it’s very simple!”

Seeing my interest in decoupage crafts, the girls suggested the first clay toy do it using this technique. And it turned out to be really very simple. We rolled out plastic from brown clay, cut out a violin from a napkin with a pattern on a musical theme, removed all the extra layers of the napkin, and glued the violin face down to our clay, which we then cut along the contour. To translate the picture, we used perfume, but if available, alcohol or any strong alcohol would do. We decided not to cover our violin with craquelure, let it be like new, without cracks. We inserted a hook for a thread - and our toy is ready to be burned!

I asked Ira to show me a few more methods that were just as easy to implement and that anyone could repeat. Ira thought and said that now we will make a set of patterned toys - a good option for those who like to decorate the Christmas tree in a monotonous manner. Zhenya and I received tasks to roll clay laces, wrap them in plastic, or combine them in a symmetrical way with other laces. I didn’t understand why we were doing this until they began to fold into something pretty when cut.

Ira revealed to us the secret of the “milfiore” (“many flowers”) technique, which is used by Venetian glassblowers. It is by the same principle that they create their intricate, bright and graceful flowers.

Then we cut the resulting blocks into thin squares and circles, and from them we laid out an excellent bright canvas, which was even a pity to cut into toys.

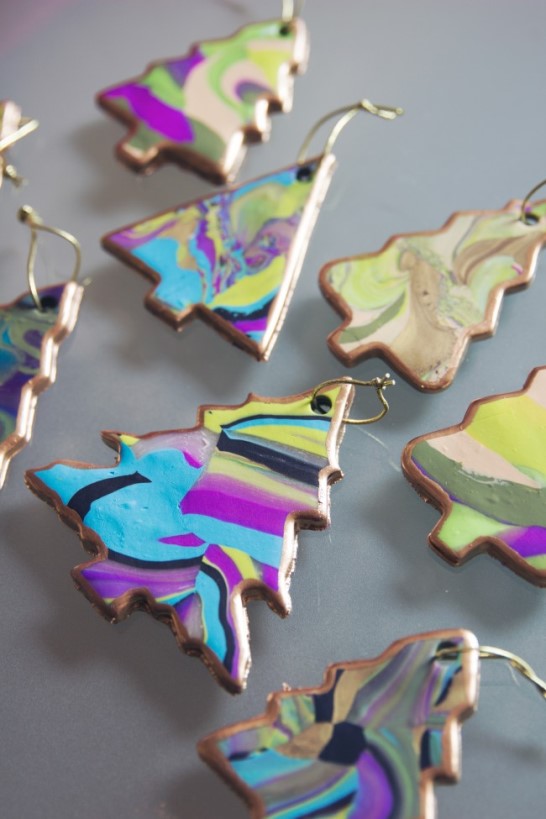
Christmas tree toys made of polymer clay
Zhenya drew stencils of Christmas trees, mittens and Christmas socks on paper, according to which we cut out toys from the canvas using a paper knife.

Using the same stencils, Ira suggested cutting “knitted” toys as well. I sculpted clay yarn, and Zhenya immediately wove it into two-color braids, which were then glued together and formed a relief fabric.

It took us less than an hour to produce two sets. And from the remains of white and red sausages, in a few seconds we made delicious lollipops.
Templates also helped us in making the following toys. You don’t need to be a sculptor and you don’t even need to have a good eye to sculpt round animals that look like cartoon Smeshariki. To make even circles, we used an ordinary glass (it looked like we were making dumplings), and we used it to roll out clay like dough, from which we then cut out the parts.

Ira decorated the owls with playful eyebrows. She took small clay balls and pressed them with a needle, and she got very naturalistic feathers!

Five minutes later, Ira, like a magician, was already giving me a red poppy! I asked how she managed to make a fluffy center with stamens so quickly, and the answer was again “very easy”, using nail scissors!

By the way, you can also make a Christmas tree with them.

Over the next ten minutes, the girls made several more New Year's friends in front of my admiring eyes, and we laid out all our art on a baking sheet. “Sonnet” clay, which Ira prefers for its plasticity, brightness and favorable cost, requires firing from three to ten minutes.

In general, after five minutes I was already the happy owner of a whole pile of Christmas tree joys and even one pair of owl earrings for my young niece!

The girls put the new things for our Christmas tree in a box, also decoupaged by Ira herself.

Ira invited me to come again, now for felting lessons, and to look at her group master classes on felting, soap making, modeling and other creativity, which she regularly reports on in her
The New Year and Christmas holidays are approaching us every day. “Krestik” has already begun preparations for this magical fairy-tale time and showed you, dear needlewomen, what gifts and New Year’s decorations you can make with your own hands. We have also made a colossal selection of the best master classes on creating the symbol of 2017 - the Rooster. In addition, we invite you to make New Year's crafts from polymer clay. And we will make a New Year's boot and a pocket, which we will fill with festive little things.

We are sure that polymer clay crafts for the New Year will be a wonderful gift or decoration for your interior! So let's get started quickly! You will need:
- Cold porcelain or plastic for creating flowers
- Paint the colors you like
- Pastel and brushes to apply it
- Scissors with sharp tips
- Floral ribbon (optional)
- Stack for plastics
- A rolling pin or any object that can be used to roll out the material
- Utility knife or blade
- Magnet
- Glue (PVA, white latex, universal “Moment” or superglue
- Wire
- Paper and pencil for templates

Sock
Draw and cut out the shape of a sock from paper.

Mix some blue into the plastic.

Roll out with a rolling pin, apply the template and cut out.

To add texture to the sock, take any fabric, place it on top and roll it with a rolling pin - the pattern of the fabric will remain on the clay. You can also experiment with lace or any textured or patterned surfaces.
If you are working with cold porcelain or self-hardening clay, it is important to add texture quickly, without delaying: then the top layer will set and become elastic.


We mix plastic of a lighter tone than our sock (you can just add white).

Roll out a small piece.

We cut out a strip for the elastic band of the upper part of the sock, apply it, cut it to the required length and glue it (round the sides).

Roll out the light clay again, cut out a semicircle and place the heels in place; cut off the excess and glue it on.

We do the same with the “nose” (place for fingers).

On the toe and heel, using a stack or a piece of wire, we make indentations imitating threads.

We pierce holes on top of the elastic with a stack - like a machine stitch.

We leave it to dry, placing a small object in the sock to create an indentation.
![]()
We do the same thing with our future denim pocket, we only change the shape.


We make a dotted line with wire, like threads on a real denim pocket.

We take pastels of white and blue colors, plan the crumbs (more white than blue).

Use a brush to tint the pocket, making “scuffs”.

Brick wall
We make a brick wall on which the Christmas stocking will hang: we paint the porcelain brown, roll it out and cut out a rectangle.

Using a knife or a stack, not too deep, so as not to tear, we make longitudinal strips.

In the same way, we complete the brick drawing with vertical hollows between the lines.

We tint with white and brown pastels.

Holly sprigs
To make dark green holly leaves, take grass and dark green paint and mix it into porcelain.

Make a holly leaf template, roll out the porcelain and cut out the leaf.

Using mold or wire we make veins.

We glue a piece of wire into the middle of the sheet and make a rod. We will need several such leaves.

Now we make the holly berries. Roll out small peas of red plastic. We make a loop on the wire, dip it in glue and plant the berry. Using the wide end of the stack, make a depression in the center of the berry and drop dark brown or black paint into it.
For this, it is better to use acrylic or watercolor, since oil takes a long time to dry.

We make buds: we roll up small pieces of plastic into droplets and string them on a wire.

Using scissors, we make criss-cross hollows. These buds and berries can be made in many different colors and sizes.

For added beauty, add small hydrangea flowers. We place a very small piece of clay on the wire with glue.

We pinch off 4 more identical pieces, roll them into droplets and roll them out into the shape of sharp petals.

Glue them one by one to the base, forming a flower.

Cones will look very beautiful in a bouquet.
To make them, we place a plastic ball on a wire coated with glue.

Using the tips of the scissors, make small cuts in a row in a circle.

Completely cover the ball with “needles”.
Cones of different colors and sizes will look especially impressive.

Candy and gift
For the “candy” we roll out the sausage white, cut to the desired size and bend one end.

Paint the dried and hardened workpiece with a thin brush with red acrylic paint.
It is important to choose a smooth brush, without protruding hairs, otherwise you won’t get neat lines.

We paint with a spiral twisted line along the entire length. Let's dry it.

MASTER CLASS ON THE TOPIC
Instead of (or together with) candies, you can also make delicious colorful donuts! Watch a master class on sculpting fruit donut beads

We mold the “gift” in the shape of a small cube and cut it diagonally with a knife.

Roll out a ribbon of a different color thinly, flatten it with your finger and glue it onto the walls of the gift.

Christmas decorations Made from polymer clay, made with your own hands, they can become not only an exclusive decoration for your home Christmas tree, but also a beautiful souvenir for friends.
Tools and materials Time: 2-4 hours Difficulty: 5/10
- polymer clay of several colors;
- cookie cutters;
- gold acrylic paint;
- brush;
- cocktail straw.
Looking at these exquisite Christmas tree decorations made of polymer clay, it is difficult to guess that they were made by hand at home.
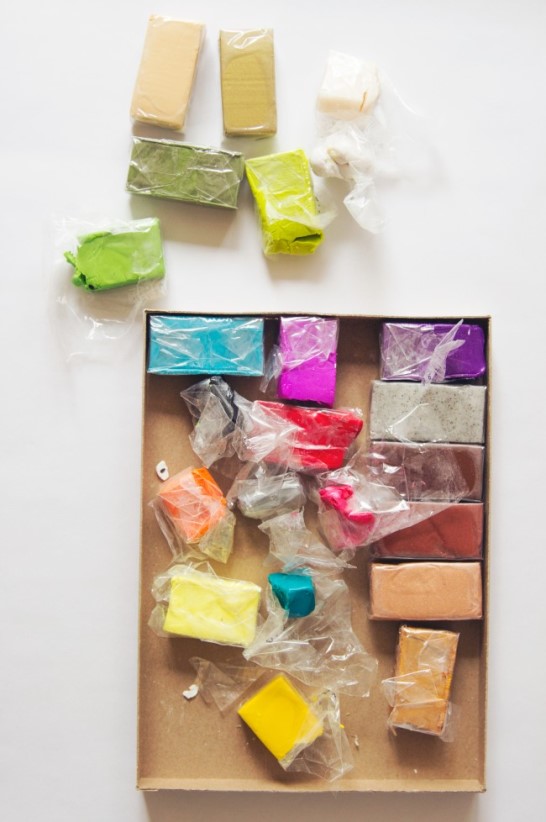
To make your own Christmas tree decorations, you will need very few tools and materials.
Step-by-step master class
Making Christmas tree decorations from polymer clay with your own hands is not at all difficult. Start by tearing off a few pieces of clay in different colors that you would like to use to make your decoration.
Step 1: Prepare the Clay
Roll these pieces with your hands into long “sausages” so that they look like in the photo.
It’s okay if your “sausages” are of different thicknesses; on the contrary, this will ultimately give the decoration a more interesting look.

Step 2: Make a clay rope
After you have made the “sausages”, roll them into one thick “rope”, as in the photo.
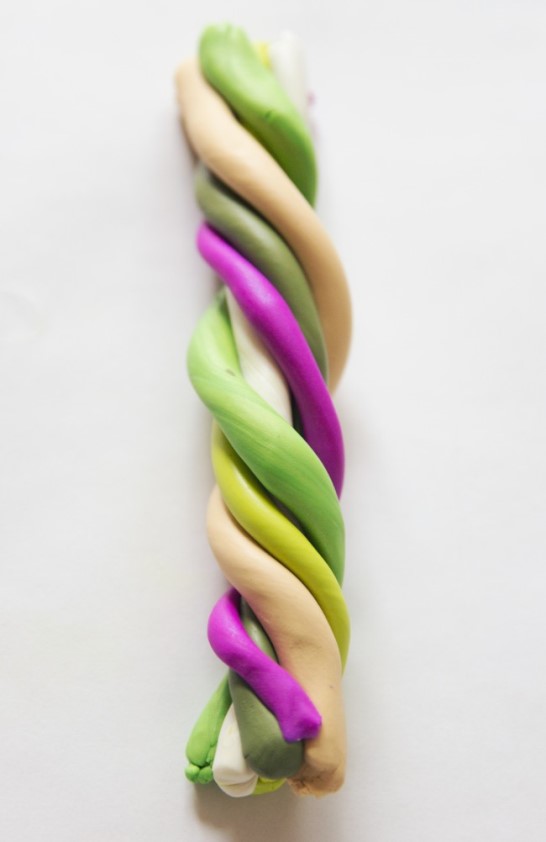
Step 3: Roll out the clay
Using a rolling pin or empty bottle, roll out the “rope” until the colors blend and create a beautiful color effect. Be careful not to let the colors mix too much and end up looking like a mess.

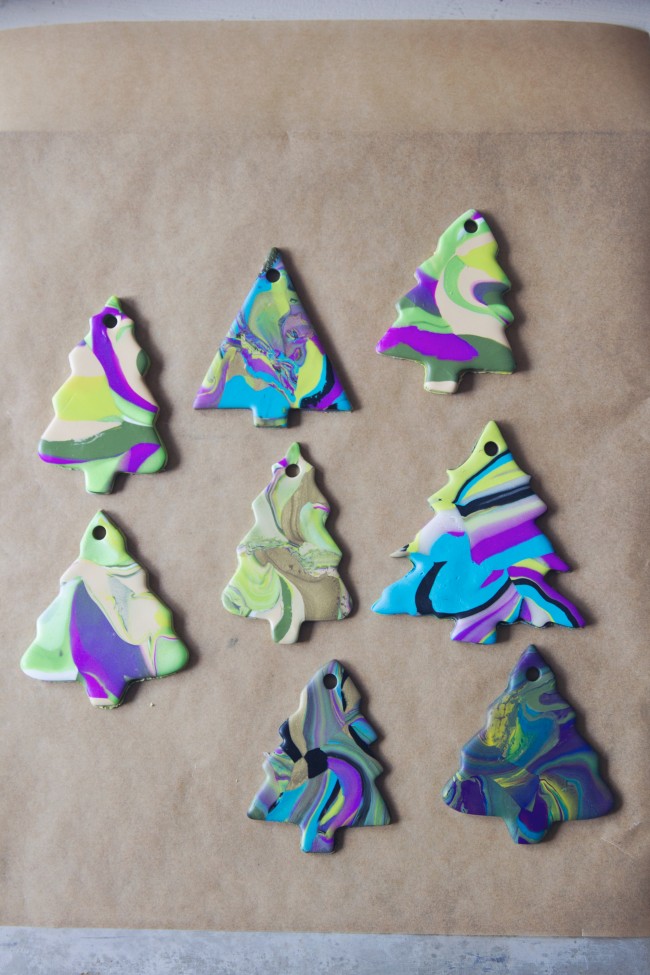
Step 4: Cut out the shapes
- Form the mixed clay into a ball. Take your rolling pin or bottle again and roll out the clay to about 3mm thick.
- After that, choose the color of the clay that you like best and use a cookie cutter to cut out a figure from it, as shown in the photo.

Step 5: Sand the product
- Remove any remaining clay and if there are any rough edges or imperfections, smooth them out with your finger.
- Place the polymer clay decorations on a baking sheet lined with parchment paper.
- Take a straw and make holes in the top of each figure so that you can then thread thread or wire through them.
Step 6: Bake the Christmas Trees
- After this, the decorations are ready for “baking”. You need to bake products according to the instructions indicated on the packaging of the polymer clay you are using, since each manufacturer has its own requirements.
- Remove the baked toys from the oven and let them cool. When they have cooled down and reached room temperature, use a thin brush to cover the edges of the Christmas tree decorations with gold, as shown in the photo.


Step 7: Varnish
After the liquid paint has dried, you can (optional) coat the surface of the products with glossy acrylic varnish.

Among all kinds of handicrafts and creativity, a special place is occupied by created toys from polymer clay. Designer products, dolls, and plastic souvenirs amaze and delight with their exquisite beauty. But this type of creativity is available not only to professional designers, but also to housewives and mothers. In addition, working with polymer clay is similar to modeling from plasticine, which even children do.
Materials for modeling
For those who decide to make a toy, the main thing is not to purchase anything extra. Next, we will consider what material and additional tools and devices are needed at the initial stage of work.
It is not necessary to purchase plastic of all kinds of colors. It is enough to buy those shades that will be present in the future craft. Polymer clay can be found in specialized departments for creativity. To glue individual elements, liquid plastic is useful, which is also used to cover ready-made toys from polymer clay. The same role is played by plastic varnishes. They can be either transparent or matte, as well as shiny. Their use gives the products brightness and durability. Apply varnish to the toy using synthetic brushes.

Special devices
Expensive tools can initially be replaced with improvised materials. Use ceramic or glass floor tiles as a workboard. Stacks that create various indentations can be replaced with toothpicks, knitting needles, pins, an awl and other handy materials. Also, to create toys from polymer clay, kits can be useful. To roll out the plastic, use a special acrylic roller, which can replace a bottle, eau de toilette and deodorant containers, or any metal rod.
You also need a sharp stationery knife and comfortable finger pads in order to avoid your own fingerprints on toys. And the most important thing is a stand for products and various elements for subsequent baking. For the same savings, you can use cardboard boxes, making holes on top, into which, in turn, insert toothpicks with parts.

As for self-hardening clay, it does not need to be placed in the oven. Products made from it dry at room temperature. But drying devices will also be needed.
MK: we create Christmas tree toys from polymer clay
Above we looked at what tools and materials are needed to work with plastic. Before you begin, prepare all the equipment.
Since it's getting closer New Year, it would be wise to make Christmas tree decorations from polymer clay. First of all, let's make a Christmas tree. During the work you will need plastic in green, brown and red tones.
To depict a spruce crown, mold a cone out of clay and use nail scissors to make cuts along the entire perimeter at an angle of 45 degrees, thereby creating an imitation of branches with needles. Then, from brown clay, mold a short trunk in the form of a stump.
Don't forget the red star. To do this, prepare a stencil and use it to make a five-pointed figure. As a fastener, carefully thread the wire through the product and place it in the oven.

Christmas tree decorations from polymer clay can be sculpted both flat and voluminous. For example, our Christmas tree is a solid three-dimensional product. Let's look at how to make toys in the form of medallions.
How to make it yourself
In special departments selling creative goods, molds are offered for applying drawings or any relief. At home, texture can be applied to medallions using scrap materials.
Take self-hardening clay and a rolling pin. You can apply the relief using various children's molds, lids, culinary figurines and other useful parts. Petals, leaves and stems of artificial flowers will also come in handy. For painting you will need sponges and acrylic varnish.
We begin the work by rolling out the required amount of polymer clay. We firmly close the remaining plastic from penetrating air. Then we leave pre-prepared prints and stamps on a sheet of clay in a chaotic manner. Then, using a mug, we cut out a medallion with a design. We make a hole for fastening with a knitting needle or a toothpick. We dry it naturally. The New Year's toy is ready.

A very exciting activity is modeling from polymer clay. Toys and dolls turn out surprisingly attractive and natural.