Elena Dyachenko
Every summer in our city of Severodvinsk there is a traditional "Parade of carriages", timed to coincide with the City Day.

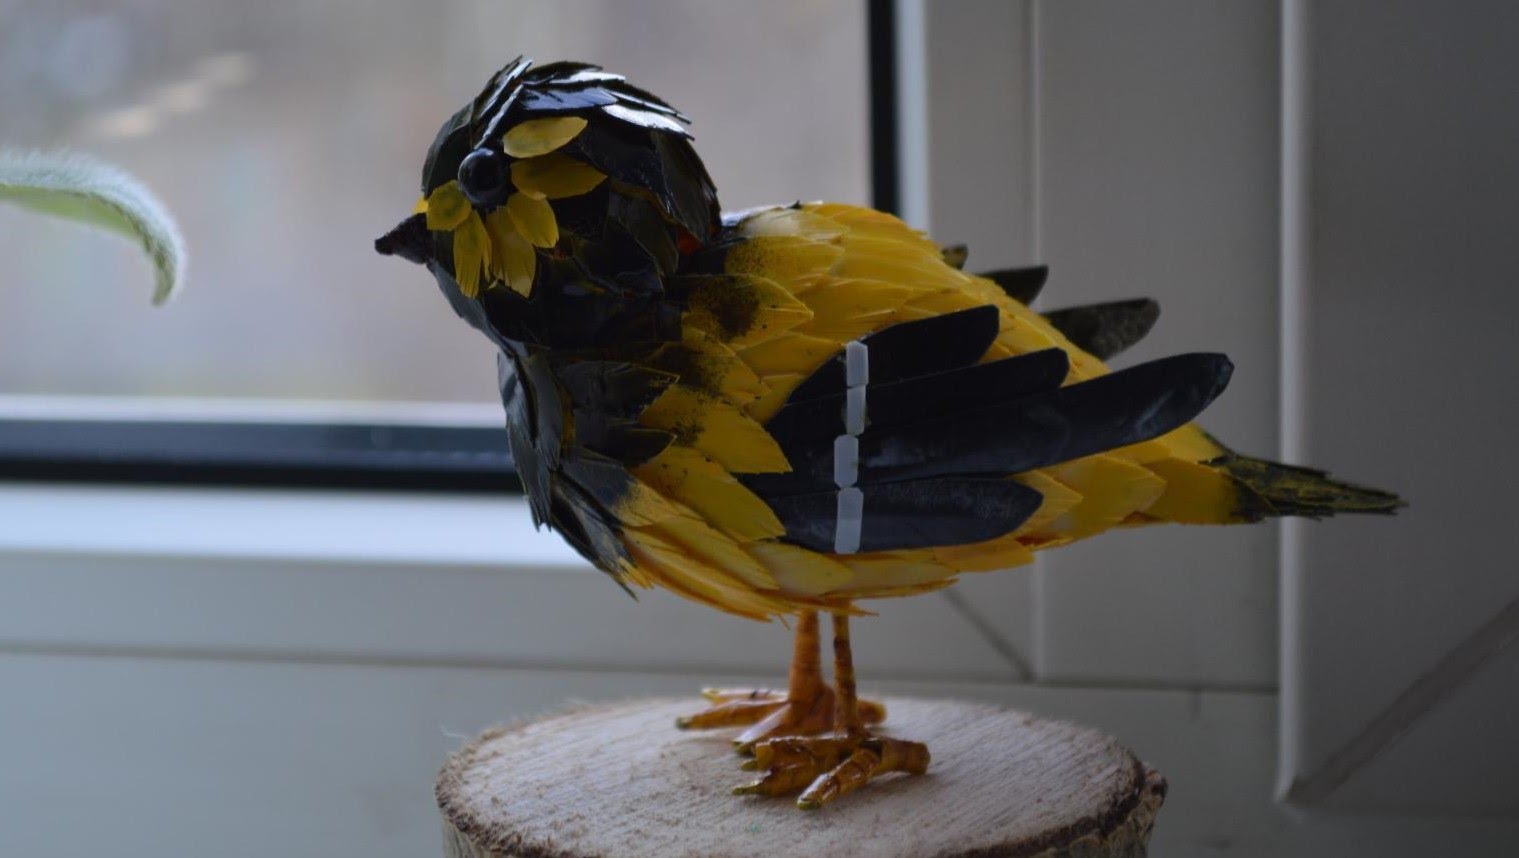
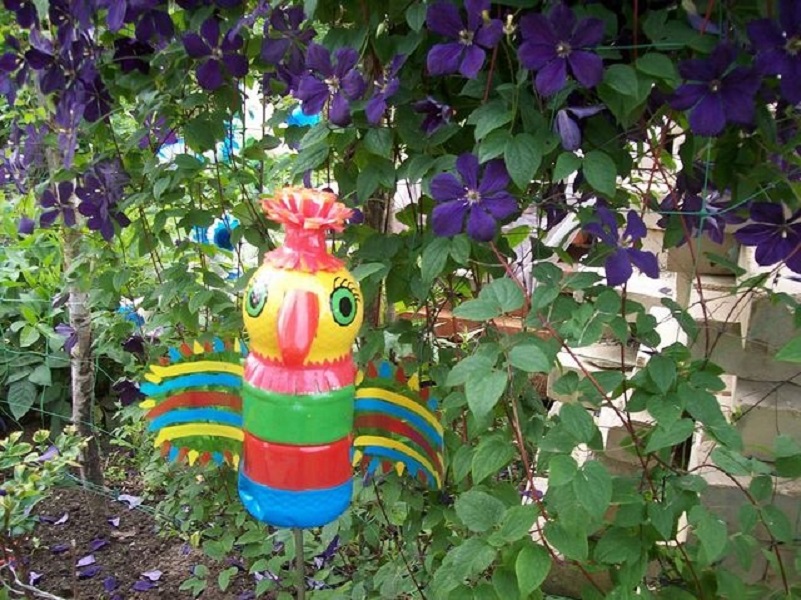
This is not the first time our family has participated in such a large-scale, spectacular and family-unifying event. This year we decided to make a stroller " Firebird"Based on the fairy tale by Pyotr Ershov" The Little Humpbacked Horse ".

firebird my husband and I made plastic bottles and covered with bright spray paint.

And for all the members of our support group, I sewed the costumes of fairy tale characters. My two-year-old granddaughter Alyonushka got the role of "Humpbacked Horse"

Mom became a "Mare". A bright suit was sewn for the niece " firebirds"Grandfather Alyonushka reincarnated as "Ivan the Fool",

and I'm in the "Tsar Maiden". The rest of the members of our group were also in beautiful costumes corresponding to the fairy tale.

After the parade of carriages, I decided to plant " firebird"to a flower bed located on the territory of the "Children's House", which I create every year.
Together with the children we plant seedlings.

Kids take care of plants with pleasure, water, loosen the ground, watch the growth of plants.


In addition, the children get acquainted with the types of plants and their structure (flowers, grass, bushes, trees, join the world of beauty. And also, with our own hands, my husband and I made figurines of caterpillars, frogs, ladybugs, snails, bees, grasshoppers, butterflies and other insects that children get to know during walks.


The fire bird of fat is a worthy decoration of the flower bed, which I called the "Merry Flower Garden", and called pleasant emotions not only in children, but also in adults. Thank you for your attention.

Related publications:
For work, we need: 1. Plastic bottles of various configurations, it depends on the configuration of the bottle appearance dolls; 2. Sculptural.
Dear colleagues! Many of us probably had to invent and make various manuals and devices for.
Sakura is one of the most beautiful trees. Flowers fascinate with their tenderness, simplicity and beauty. In Japan, sakura is not grown for its fruit.
You will need: 60 empty plastic bottles of the same shape; foam rubber - 1.5 x 1.1 m; coarse calico - 1.5 x 1.1 m; fabric ribbons - 7-8 wide.
A little about this flower. Lilies are very beautiful flowers, they belong to the Lily family. The lily has large buds of various shades.
One of the most popular garden decorations today is a heron, so for the owners of suburban areas the question becomes very relevant: “How to make a heron for the garden with your own hands”? Buying special figurines for your own “fazenda” now, during the crisis, is an expensive business. Many people want to decorate the garden area on their own and with improvised means. Here are some tips.
An unusual decoration for any dacha is a do-it-yourself heron from improvised materials.
Heron made of plastic
The main material for garden crafts is plastic, or rather bottles from it. To create a cute heron, any hostess should stock up on the following:
- The largest plastic container is about 5 liters (more if possible).
- Regular wire.
- Drill.
- Spatula and, accordingly, putty.
- A small wooden log.
- Acrylic glue and paint.
The way to create such a miracle bird is quite simple. Mandatory requirement - accuracy, patience and minimum Creative skills. Sometimes, it also requires man's hands to get the most out of your drill.

A beautiful bird for decorating a summer house can be made from several 1.5 l plastic bottles, wire, glue and paints.
The sequence of actions when creating a heron is as follows:
- Take a bottle - the basis of the bird from which the body will be built. Create a neat beam from a wooden log. It should optimally fit into the body of the miracle bird, that is, not fall out of it.
- Insert the timber into the plastic base. The base for the garden figurine is ready.
- The next stage is men's work. Drill required. With it, make holes in the tree, preferably non-through. They are designed to insert wire into them - the basis of the bird's legs and neck. In this case, the size of the holes should be less than the diameter of the wire. The latter must hardly enter the beam so that the heron does not fall apart.
- Now you need to carefully insert the wire and give it the shape of the legs of a heron. So that the legs do not accidentally fall out, it is necessary to pour a solution of Moment glue into the holes. On this stage the main thing is to give the legs a position in which the future bird will not fall into the flower bed from wind or rain. This is not always possible. Therefore, some summer residents install the bird on a small pedestal and support it with some kind of rod, preferably iron.
- Wrap the heron, or rather its frame, with fabric pieces. In order for the bird not to seem emaciated, you can put foam rubber in some places, for example, in the body area.
- The penultimate stage is wrapping the heron with a special mesh, on which a solution of glue was previously applied. Finally, again coat the figure with glue, but not with universal glue, but with PVA. This is necessary for smoothness. To make the heron look good, it should be covered with acrylic paint.
Back to index
Heron created in a frying pan
The purpose of creating figurines with your own hands is aesthetics. Such imposing garden accessories, and even made with your own hands, give a special comfort not only in the garden, but also in the apartment. Moreover, not only a drill and a tree, but also an ordinary frying pan can become improvised means.

The most difficult material for creating figures with your own hands is clay.
To create a bird in this way you will need:
- several plastic bottles;
- fishing line, awl and metal rods.
First you need to collect the "feathers" of the heron. To do this, cut off the bottoms of the bottles. The containers must be the same size. Then ordinary sand is used, which any gardener and gardener has. They put it on a cast iron pan and heat it up, then put the bottle bottoms there, one by one, thereby leveling them. It turns out the foundation for the plumage of the heron.
Then collect the "feathers" on the fishing line. Pre-create two holes in the bottoms with a hot awl. They should be parallel to each slice. The result is a “feather garland”.
The third stage is the formation of the body of the figure. To do this, take a large plastic container with a cork. This is where the metal rod is inserted. This is the neck of the future bird, which is wrapped in polyethylene. Finally, they put on a garland of bottoms around the neck and base. The main thing is that the layers should fit as tightly as possible to each other. Here the heron is ready. What remains are the eyes, made from corks, and the beak, cut out of plywood and painted. The base of the legs is metal rods that pierce the lower part of the plastic body. Such legs are easy to stick into the ground, and the figure itself is simply enough to be transferred from one part of the garden to another.
Back to index
Clay bird for giving
A more complex option is a clay heron, which can decorate not only a summer house, but also an apartment, as it looks very stylish.

To create figures from cement, it is necessary to make a solid frame.
You will need:
- clay;
- a mixture of clay and water, brought to the consistency of sour cream (connoisseurs call this “slip”);
- paints for ceramics.
Clay is shaped into a tourniquet by rolling. Connect it. They create another version of it, only longer, and stack it on the first one. Connect again. Repeat this several times: the heron will need about 20 harnesses, each of which is longer than the other.
The second step is to make a tourniquet of a shorter length than all the previous ones and apply it to the formed head of the heron. Moreover, the head itself should be smaller than the body.
The third stage is the creation of a clay cake. This is the bird's forehead. The cake is folded around the edges. Now you need to use the stacker and slip to level the surface. Next, you need to let the future figure dry.
The fourth step is bird claws. They are created from thin clay bundles. The best option- create a semicircular shape for them. So the claws look more voluminous.
At the fifth stage, bird wings are created from the bottoms of plastic bottles in the same order as described above. The main thing is to outline with the help of a stacker those places where the plumage will be located. Then they create a beak and eyes from bottle caps and plywood.
After that, the bird should be burned, preferably in a specialized oven, and paints intended for ceramics of the lightest tone should be used so that the product looks like a heron.
1. Weld a frame of rods, if you make a smaller bird, you can tightly twist the rods with wire.
2. The body of a 10 liter canister, I cut out a strip on the upper part and shift it back - I attach it with self-tapping screws. From 2 liter bottles I cut out feathers and close the resulting hole.
3. I put on the wire the “fingers” cut off from the tubes, the nails from the bottles.
4. The leg itself is a hose from a vacuum cleaner. I fasten with screws.
5. This is what the leg looks like.
6. I attach a bag from a bottle to the top of the leg, forming a thickening. Then I attach long feathers to it, forming the necessary shaggy legs.
7. This is what it looks like up close.
8. For the head, I glue two pieces of construction foam with Titan glue.
9. I remove the excess with a hacksaw.
10. I highlight the beak.
11. I give shape.
12 I sand with sandpaper to smoothness, deepening the eye sockets.
13. Insert eyes - (For soft toys.)
14. I strengthen the beak with a part from the bottle, I glue the eyelids to the eye.
15. I make a neck from a 5 liter bottle.
16. Neck front view.
17. I fasten the feathers to the neck with wires through the punctures with an awl. I glue "Titanium" to the head. In the recesses of the head I additionally attract with self-tapping screws.
18. I cut flight feathers from 3-liter bottles. The width of the pen is 6-7 cm. I attach it to the metal mesh with a wire through the punctures with an awl.
19. The second and subsequent rows - feathers from 2-liter bottles. 8 pcs. from one bottle.
20. Another row of feathers.
21. Finished top wing.
22. Flip the wing over to attach the feathers underneath.
23. At the bottom of the wing, the feathers should be straight, for this I use only the middle of the bottles (without rounding.)
24. This is what the lower part of the wing looks like.
25. I attach wings to the base,
then I will close the connection with feathers,
attached to the front side and bent to the lower part of the wing.
Alena we wish you good luck and creative success. Don't forget to share your new work with us.
Crane
1. For the head I use construction foam 10 cm thick. I saw off the desired piece with a hacksaw (about 30 cm along the long side).
2. I cut off unnecessary parts.
3. I round off all the edges.
4. I divide the head into approximately three parts, where the lower two-thirds of the cheeks.
5. I round off all the details, highlight the beak, cutting it off quite thinly. I cut holes for the eyes.
6. I enlarge the eye sockets, narrowing the head towards the beak.
7. I sand the head with sandpaper, highlighting the details. I cut out the eyelids from thin foam. The eyes are from a soft toy.
8. All the same, but in front.
9. I glue a strip from the bottle on the beak until the glue dries, fix it with electrical tape.
10. All the same, but in front.
11. So I pierce and connect the feathers.
12. From the middle of a large bottle, cut out flight feathers (width 5 cm), 9-10 per wing.
13. A couple more rows of cover feathers.
14. We also cut the secondary flight feathers from the bottle, but shorter, fasten them in a semicircle, slightly covering the first ones (the wing is slightly folded).
15. Wing.
16. For a 30l tail, I cut the bottle across into strips of 5-7 cm, I connect it with a fan.
17. Slightly lift the edge of the mesh at the back and fasten the tail. The next row is again from 1.5l bottles.
18. Side view.
19. I cover my back with feathers from 0.5l bottles.
20. From below, I will close the wings with feathers cut from the middle part of the bottles (they should not bend).
21. You will get two rows, the joints will be closed with feathers bent from the front side.
22. Finished wing.
23. Wings view from below.
24. I make the body. In this case, the frame is welded, but you can twist all the details with wire.
25. On the neck is a hose from a vacuum cleaner, a canister of engine oil on the body.
26. I put plastic tubes on my legs, cut out paws from a 0.5 liter bottle.
27. I fasten the hose to the head with a long self-tapping screw (lubricate it with glue).
28. I cut off the handle from the canister, remove a part from the top (it will be needed for work), thickening of the legs (“legs”) from the tops of 2l bottles.
29. Feathers for the body are also from 2l bottles. One will make six pieces. We need both short and long ones.
30. I close the body completely.
31. At the bottom of the neck, a fringe of halves of 2l bottles closes the connection of feathers.
32. It remains to connect the details.
33. I painted this crane with spray paints, I was pleased with the result.
Stork
For the manufacture of storks we need:
1. Two canisters of 5 liters
2. Metal mesh for wings
3. Strong wire
4. Plastic tubes for legs and neck
5. Styrofoam for the head
6. White milk bottles
7. Dark beer 1.5l
8. Hose from a vacuum cleaner (can be replaced with a corrugation)
1. For the head I use construction foam 10 cm wide
2. I cut out the workpiece, highlight the eye sockets, make a flat beak.
3. I grind to smoothness with sandpaper, insert eyes (or beads)
4. I glue the eyelids, strengthen the beak with a part from a plastic bottle, gluing it to the “Titan”. At the second stork, I make the beak open.
5. For the body I take a 5l canister.
6. I cut off the handle.
7. I bend the mesh in the shape of a canister - this STORK will have wings folded.
8. I round off the "wings".
9. I bend the wire for the legs.
10. A liter milk bottle is cut into 6 feathers.
11. I cut feathers.
12. I start to fasten the feathers from the lower part of the body.
13. I strengthen the wire for the neck and put a hose on it.
14. I fasten a number of feathers to the hose with self-tapping screws.
15. Side view.
16. I cut the halves of milk bottles with a fringe and fasten them around the neck with adhesive tape.
17. I start with the flight feathers on the edge of the wing.
18. The second row overlaps the first by one third.
19. The third and subsequent rows of white bottles.
20. Paws from 0.5 l bottles.
21. Making the body for the second stork.
22. As with the first one, I cut off a part of the canister from above - it is necessary for screwing the feathers.
23. I cover the body with feathers, but, unlike the first, I fasten the feathers to the entire canister.
24. This stork's wings are slightly open. The first row of feathers from 1.5 l bottles (6 pcs from one)
25. I screw the second row only on the rounding of the wing.
26. The third is for the whole wing.
27. I make the tail - it is short, the feathers are slightly parted.
28. Turn the wings over to screw the feathers onto the underside.
29. The last row, covering the edge of the wing, is made from feathers bent in half, rounded on both sides.
30. Approximately so it looks.
31. Each of the subsequent feathers closes the junction of the previous one.
32. We fasten the wings with self-tapping screws and paint the birds.
If you live in a private house or you have a dacha, then you have probably come across a desire to transform your flower bed or front garden. The easiest way is to go to the store and get a nice little plaster figurine. Yes, it will decorate your yard, but every second gardener has one. To bring to your household plot some zest, you can make a beautiful bird from ordinary plastic bottles. You will spend more effort and time, but the result is worth it.
First, collect plastic containers from all neighbors and acquaintances. Suitable bottles of any color and size. The more you collect this material, the larger your craft will turn out.
The second stage is the manufacture of plastic feathers. From one bottle, on average, 3-4 feathers are obtained. They are easy to cut with regular scissors. Just cut off the neck and bottom of the bottle, and cut the middle part into oblong oval blanks. To give texture, cut the fringe along the edges. Feathers of different sizes are needed for one bird.
You also need to prepare a base - a strong wooden board. Bird legs and wings can be made from thin plastic tubes. The torso and head are cut out of foam and wrapped with a mounting mesh (or metal mesh). Self-tapping screws are needed to attach the feathers. Also prepare a balloon of mounting foam, spray paint and some corrugated pipe.
And now you will learn about the secrets of making some examples of work.
Capercaillie
This bird has a magnificent tail and its head is raised up. It is these characteristics that must be conveyed in the manufacture of crafts. Fasten the cuts from the plastic pipe to the board - these will be the legs. Cut out the torso and neck from polystyrene foam, connect them together with mounting foam. Attach a circle-shaped metal mesh to the back of the body and cut wings out of it. After that, start fixing the feathers of an oval oblong shape with self-tapping screws. You need to move from bottom to top and from back to front, constantly overlapping the caps of the screws of the previous row. The beak is two plastic triangles, and the eyes are large black beads. Feathers are painted from cans of green, red, yellow and white.

Owl
For the manufacture of such a bird, it is better to use brown plastic bottles. Eagle owl feathers are short but lush, so the edges of plastic blanks need to be slightly singeed with a lighter. This will add texture to the craft.
The torso and head must be cut out of foam, placed on plastic tubes and fixed on a wooden stand. Then, moving from the bottom up, you need to fix the feathers on the screws. The eyes are made of white plastic, and the pupils are made of disposable spoons. Paw toes are cut from a thin corrugated hose.
You can paint the owl with golden spray paint.


Stork
White (milk) and brown plastic bottles are suitable for making a stork. For the wings, the blanks should be with a fringe, and for the body without it. On the neck you need to cut strips from bottles and make a fringe on one side.
Two long plastic tubes are fixed on a stable board. On them is a ten-liter canister at an angle, neck up. Slightly curved trimmings of a thin pipe are attached to the sides, and a larger diameter pipe needs to be fixed in the canister hole. The canister and sections of the wing are wrapped in a metal mesh. Plastic oval blanks are gradually fixed on them.
The head of the stork is made from an old ball, and the beak is carved from a plastic bottle.
After manufacturing, you only need to paint the head with white paint and draw eyes, and cover the beak and legs with red paint. The stork turns out to be of impressive size.


Flamingo
This bird has long legs, a thin elongated neck and a large beak. For its manufacture, plastic bottles of any color are suitable. The body is a large canister, from the bottom of which legs are attached - long thin tubes. Fingers are pieces of corrugated hose. From the same hose you need to make a neck, threading it onto a strong wire to give the neck the necessary bends. The head is carved from thick foam.
The craft should be painted in a pale pink color, and the beak in white and black tones. The bird's eyes are made of beads.


These original decorations for a summer cottage can be made from waste material.
Birds from plastic bottles are a popular decoration for a suburban area or local area. The availability of improvised materials is the main reason for the demand for crafts. You can make birds with your own hands of any category of complexity, it all depends on the skills and availability of free time. Simple master classes are suitable for beginners who love creativity from plastic bottles or who want to involve children in the process. Medium and high difficulty will require painstaking work, but the result will be a real masterpiece landscape design.
Preparatory Steps
Making a site is a fascinating activity, it is much more interesting to make a bird with your own hands than to purchase a finished copy for decoration. This gives you the opportunity to show your creativity. And who is a little lacking in their own imagination, presented step by step guide about birds from plastic bottles will be a reliable help in needlework.
Auxiliary improvised materials will help to make the craft original. Depending on the type and size of the bird chosen, the work may require:

In the process of working on a bird, scissors, a stapler, an awl should be at hand. Regardless of the chosen figure, plastic bottles are thoroughly washed before the start of the creative process, the remnants of labels and glue are removed. Otherwise, the birds will quickly become dirty and lose their attractiveness.
Comment! The main difficulty in the manufacture of birds based on plastic bottles is plumage. The thicker and finer it is, the longer it will take.
The simplest crafts contain a minimum of details; figures with large plumage can be attributed to the middle category of complexity. To make a masterpiece, you will have to be patient and time.
Beautiful do-it-yourself birds from plastic bottles are presented in numerous photos:


Simple, fast, beautiful
You can quickly decorate the site, spending a minimum of time and effort, using simple bird figures, which use a small amount of detail. The decorative effect is achieved due to the bright coloring.
Chick
You can make a chicken different ways, it all depends on the chosen container. If a small figure is required for a landscape design composition, dense 1 liter plastic bottles, where there were dairy products, will do. The average size will be obtained from a container of 1.5 liters. To make the chicken visible from afar, you can take a plastic container of 5-6 liters. The main steps are not difficult:
- The selected container is covered with bright yellow paint.
- A scallop, beak and paws are cut out of dense plastic, which are fixed with an awl and wire.
- Chickens look more impressive, where wings are additionally cut and fixed from bottles.
- At the final stage, the eyes are drawn to the chicken.


A cunning fox from a plastic container, which lurks not far from the chicken, will help to give the composition originality.

In order for the figure of a bird to play not only a decorative role, but also bring practical benefits, figures of birds from plastic bottles are often used as containers for plants. The chicken idea is no exception. The following photo shows great idea, like a bright chicken at the same time serves as a flower pot.


Parrot
Even more ways to make a motley parrot based on plastic bottles. Let's start with the elementary. For work you will need:
- Plastic bottles, preferably 1.5-2 liters.
- Flat container made of thick plastic.
- Self-tapping screws, glue and scissors.
- Acrylic paints.
The easiest way to make a parrot is to choose a bottle with a spherical shape for the body, which will turn into a head. The neck is covered with a funny crest, which is also cut out of plastic bottles.
In order not to be mistaken, the details of the wings and tail are first drawn on paper. For plastic bottles, the neck and bottom are removed, cut lengthwise and left under pressure overnight. Paper blanks are transferred to plastic and cut out. All elements are painted separately. Then the torso, wings, tail and crest are joined together. The beak is cut out of thick plastic. An ordinary metal twig will help to fix the parrot on the ground. Even a 10-year-old child is able to make such a bird.

Advice! In order not to get hurt in the future, it is recommended to melt the carved parts of the bird over a small flame, an ordinary candle will do.
If you want to make a parrot with plumage, much more effort will be needed. The bird, painted in exact accordance with the cartoon character Kesha, looks extremely impressive. We will not go into the nuances of making a colorful figure, they will be described using the example of a rooster from plastic bottles.

Medium difficulty category
Graceful swans and exotic flamingos always attract attention. You can make them yourself from plastic bottles.
Swan
White milk plastic container with a volume of 0.3 l is ideal for making a swan.
Action algorithm:


Comment! Work on the formation of plumage begins from the bottom up or from the back forward so that the upper element covers the attachment point of the lower part. This rule applies to all instructions on how to make a bird using plastic bottles.
The main stages of the creative process are shown in the photo.


Flamingo
It is enough just to make flamingos from plastic containers. A large bird does not require scrupulous actions to cut out numerous small feathers, so the process moves quickly.
A plastic canister with a volume of 10 liters is usually taken as a basis. PVC pipes are required for the legs, it is better to make the neck from a flexible hose. As you can see in the photo, the upper part of the bird's legs is made from milk bottles. The body is decorated with large plumage. The final touch is the coloring of an exotic bird in bright pink. A large figure needs careful fixing on the site. Long legs are better fixed in the ground. If you do not plan to move the flamingo, you can even fill it with a small amount of concrete.

The bird looks unusual, where the bottoms of plastic bottles are used instead of plumage.


Peacock
A peacock or a firebird, which are also based on affordable plastic bottles, will help you immerse yourself in a fabulous atmosphere on the site. You can make the process easier by replacing part of the plumage with plastic bags.
Main stages:


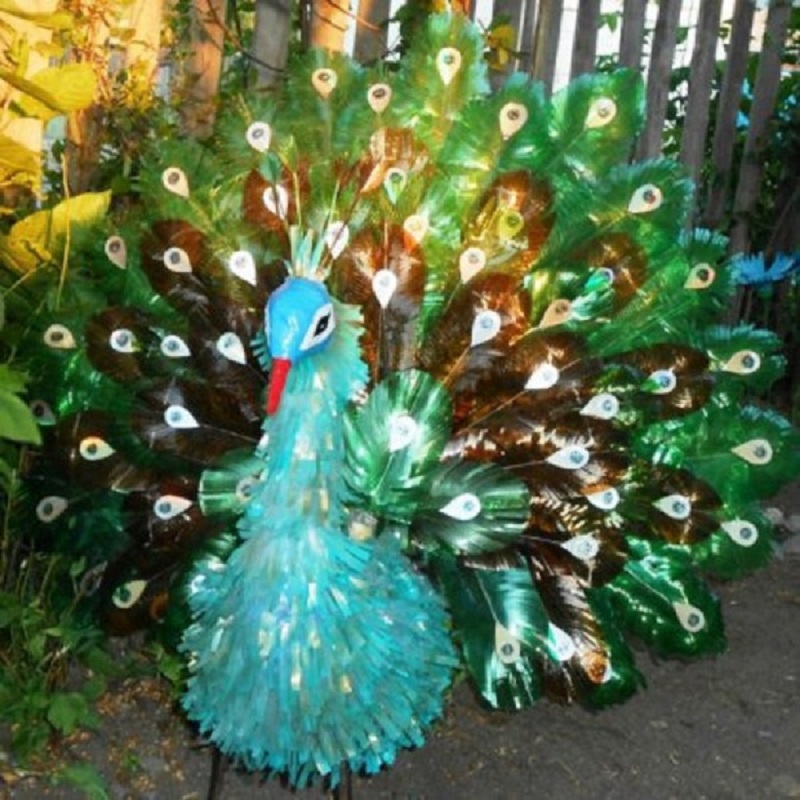
To keep the peacock stable, the body is pre-filled with sand. Peacocks look incredibly impressive, where the plumage is completely made of plastic bottles. Original coloring will help to make an individual bird, which will be different from all the presented specimens.


Masterpieces of creativity
Experienced craftsmen can be offered instructions on how to make a rooster out of plastic bottles. For crafts you will need:
- Canister made of plastic on the body.
- 5 liter bottle for the neck.
- Plastic pipe 40 cm for bird paws.
- Bottles 1.5 l for the design of the thighs.
- A lot of plastic containers for plumage.
frame
The formation of any bird, including a rooster from a plastic bottle, begins with the creation of a frame.
Key steps:
- The side of the canister is cut off and pushed aside.
- The pipe is bent in the shape of paws and screwed to the canister with self-tapping screws.
- A 5 liter container is folded into a bag, this will be the neck of a rooster.
- Plastic bottles of 1.5 liters, cut off at the top, will help to make a thickening on the legs.
If you plan to make a small bird, take a smaller container.

Head
You can bring the figure of a rooster as close as possible to a natural bird if you make a head out of foam. Such work is distinguished by jewelry and requires certain skills. It is quite difficult to cut a single element, it is easier to separately prepare the head, comb and beard, and then connect the parts. Then the workpiece is prepared for staining, for this:
- the foam bird's head is sanded with sandpaper.
- the surface is treated with acrylic putty;
- when the mixture dries, it is re-sanded;
- a layer of PVA will give the workpiece the desired smoothness and prevent excessive absorption of acrylic paints.
You can decorate the head of a bird in various ways. Eyes draw or attach small details of a suitable shape. Handicraft shops will provide a wide selection of decorative items. The scallop and beak are easier to cut out of plastic containers than cut out of foam.


Plumage
The plumage of birds varies depending on the part of the body. The tail usually consists of long feathers. Large parts are also required for the wings. The torso and especially the neck are decorated with small elements. Compliance with proportions will bring the decorative figure as close as possible to the selected prototype. Small feathers are fixed with wire into holes previously prepared with an awl, large elements can be fixed with self-tapping screws. When forming the wings, a reinforcing mesh is often used.
The legs of the rooster also deserve attention. The plastic tube at the top is supplemented with bottles fixed upside down, the lower part is crowned with paws twisted from wire and wrapped with twine.

When to stain depends on the color of the bird. A solid figure can be covered with a decorative layer at the final stage. It is better to color the elements of colorful birds in advance, before starting the assembly.


When you have the skills to work with plastic bottles, you can make a real masterpiece to decorate the site. Whether it will be an important rooster, an owl at night or a royal pigeon - it is up to the master to decide.