Many owners of their garden plots spend a lot of effort fighting pests. To somehow make your life easier, you can attract starlings for these purposes. They mercilessly destroy not only caterpillars and beetles, but also their larvae. Thanks to this help, the dacha area is completely cleared of these pests within a week. To attract such useful bird, you need to make a house for her. For this, various available materials are used, for example, a plastic bottle, cardboard, box and others. Various versions of birdhouses can be seen in the photo.
Necessary materials
The lightest and most accessible material is considered to be a plastic bottle. To make a birdhouse out of it with your own hands, you will need the following tools and materials:
- drill, drill bits;
- stationery knife;
- pliers;
- 2 liter plastic bottle;
- waterproof acrylic paints (dark brown, beige, light brown, black and dark green);
- unwanted CDs;
- glue for plastic items;
- wire;
- brush or sponge for applying paint;
- scissors;
- Scotch tape, electrical tape.
These materials can be easily found at home.
How to make a birdhouse from a plastic bottle?
You need to take an ordinary 2 liter plastic bottle. Use a sharp utility knife to make a round hole. at a distance of 3 cm from the bottom. A little below this hole, you should drill a small hole with a drill and insert a long dowel into it. This is the future perch for the bird. After this, paint the bottle in two layers of brown paint. Starlings like their house to be cozy and dark, so the bottle birdhouse is painted over very well, without any gaps.
Then they take a bottle cap and drill two small holes in it, thread a wire through them and twist the ends well. The result should be a strong loop, with the help of which the house attached to a tree or pole.
Thus, the birdhouse from plastic bottle ready. To make it more beautiful, you can decorate it.
How to decorate a birdhouse
To decorate a birdhouse, take paper or thin flexible plastic and make a window stencil from it, the image of which will fit perfectly into the birdhouse. Then you need to make a beautiful roof. To create the look of a tile, a CD is heated and cut, and this is done in such a way that identical pieces are obtained. Each piece can be painted brown, and for greater effect, the tiles can be multi-colored.
Now you need to attach a roof to the house. The lowest layer is “set” with glue, and for strength, each piece is secured with tape. Then all subsequent layers are secured only with glue.
To make a birdhouse made from a plastic bottle more comfortable, the bottom is covered various materials , such as:
- rags;
- twigs;
- pieces of cotton wool;
- hay.
You can be sure that the birds will appreciate such comfort.
Making birdhouses from other materials
Bird house made of cardboard
In addition to plastic bottles, a birdhouse can also be made from cardboard. To work you will need:
- self-adhesive paper with laminated coating;
- starch;
- corrugated cardboard;
- twine.
In addition, you will need tools such as scissors, a ruler, a pencil, a cardboard cutter, a square and a compass.
The work begins with the fact that on all workpieces markings are being made. Then the parts are cut out in duplicate. You should make a paste from starch, since ordinary synthetic glue has an unpleasant odor that can scare away birds.
The finished parts are glued together in pairs to form double walls. This is necessary for their strength. A hole should be cut in the front wall for the entrance, and in the back wall 4 small holes should be made for string, with which the birdhouse is tied to the tree.
The walls are glued end-to-end to each other, maintaining a right angle. The result should be a box. During drying, it is wrapped with threads. The roof is glued together in two parts. The smaller part is placed inside the structure, and on the larger part, allowances are made on all sides.
A birdhouse made of cardboard can last longer if it is covered on the outside with laminated paper. The surface is completely covered, resulting in a very beautiful birdhouse.
Bird house out of a box
If it is not possible to find basic materials, a birdhouse can be made from a ready-made item, for example, a box.
In this case, you will need an empty juice or milk container volume more than one liter. It should be washed and dried, and then a standard tap hole is cut out. To strengthen the bottom, use thick cardboard or wood. Holes are made on the top of the box that will be used for wire. Using it, the birdhouse is hung on a tree. The outside of the house is covered with beautiful paper with a protective coating.
 Before you start making a birdhouse with your own hands, you should protect yourself from all kinds of injuries. To avoid planting a splinter, be sure to use gloves.
The roofs of the houses are made single or gable, with a slight slope back. Birds are afraid of bright colors, so the covering should be dark tones.
Birds like their nests to be very high off the ground. Before hanging a birdhouse on a tree, you should make sure that the place is safe and trunks are thick and strong. It is best if the house is not conspicuous, because when the chicks are hatching, there is no need to pay too much attention to the birds. The birdhouse can also be attached to tall metal posts.
Thus, by making a birdhouse with your own hands, a person brings not only benefits to the birds, but also to himself, since starlings are able to destroy a large number of harmful insects in their summer cottage. A house made from a plastic bottle, if you make it cozy, will give the birds real pleasure.
Birdhouses are an invention of civilization. Until recently, birds, even without humans, found shelters in which they could lay eggs, hatch them and hatch chicks. But the situation has changed: there are practically no hollow trees left, especially in urban areas. It became difficult for birds to find places for nesting and people figured out how to help them. They invented analogues of natural nesting places - these are birdhouses, titmouses and houses for other birds that you can make with your own hands.
How to make a birdhouse with your own hands at home
The most popular indoor nesting sites for birds are birdhouses. Starlings need this house not for living, but for breeding. Therefore, a number of specific requirements are imposed on it.
Requirements for proper crafts for birds
- Safe for birds;
- Convenient for laying eggs and hatching chicks;
- Warm enough but with good ventilation;
- With a tray of the appropriate size.
Materials for production
What are bird houses made from at home? Most best material Nature came up with this tree, which is familiar to birds. Practical houses should not be made from chipboard, fiberboard, plasterboard, soft cardboard and other unsuitable materials. Wooden structures can stand for a long time, while paper, lining and cardboard quickly collapse under adverse weather conditions.
It is better to take hardwood boards. Conifers are not the most suitable material. They secrete resin and make bird housing sticky and dangerous for birds. Resin can glue the plumage of birds, and this is fraught with diseases and even death of birds. But you can hang a birdhouse on any tree in your country garden or yard. Here it doesn’t matter where the birds live, the main thing is that it is warm and protected. 
For decorative birdhouses, which are installed in places protected from wind and rain, boxes, bottles, cardboard and other materials are used.
Designs, forms and diagrams of the device
All birdhouses can be divided into two groups according to schemes:
- Houses of various shapes;
- Duplyankas.
A traditional birdhouse is a rectangular box with a flat, pitched or gable roof and a round entrance hole. The size of the entrance determines who will live in the house.
Dimensions
- Height: 30–40 cm;
- Bottom length and width: 14–16 cm;
- Taphole diameter: 5 cm.
If you reduce these dimensions and make a hole 3–3.5 cm in diameter, you will get a titmouse. Birds will settle in it, and every day they eat insect pests and various larvae several times more than their own weight.
How to make according to drawings
The house must be built as it should be, otherwise it will simply fall apart from the first gusts of wind. It is important to respect the dimensions. In a house that is too small, the birds will be cramped; in a large house, it will be cold. Often a perch is made in front of the entrance - a perch. Birds use them extremely rarely.
It is especially important to maintain the correct size of the tap hole (inlet hole). It should be such that birds can pass there freely, but predators such as cats and crows cannot get in.
You can make a birdhouse in the form of a nest box. To do this, use part of the trunk of a deciduous tree and hollow out the core in it. The nest is closed at the top and bottom and a hole is made in the side wall. Such a house will resemble a natural hollow for birds.
How to make from wood
Boards made of alder, birch and aspen are suitable for nesting. The inside of the house should be rough. Smooth boards need to be treated with a chisel - apply horizontal notches. The chicks will be able to cling to these ledges and easily get out of the house.
In addition to the boards you will need:
- Nails;
- Wood glue;
- Ruler and pencil;
- Wood hacksaw, jigsaw;
- Chisel or drill;
- Hammer.
- Water-based paint and decorative elements.
Sometimes the houses are painted. You should not decorate them with bright flowers, as this may scare away the birds.
Birdhouse made of plywood and clapboard on a branch
This is the simplest design bird house. The tools are no different from those used when working on a wooden birdhouse. Depending on which roof you chose for the birdhouse (single or gable), you will need 6 or 7 parts. So, let's build a house out of plywood.
Manufacturing stages:
- Drawing. You need to decide on the dimensions, make a sketch, clarify the placement of the walls, lid, bottom and fastenings and start creating a drawing.
- Cutting and Sawing. First you need markings. All parts are transferred to plywood so that the bottom covers the sections of the walls, and the upper part protrudes in the form of a visor. Cut plywood adjusted for the width of the jigsaw and the gap.
- Assembly of parts. All cuts need to be sanded. You can connect the parts using glue and self-tapping screws. It is necessary to glue the side walls and the front facade. After the glue has completely dried, the structure is strengthened with nails or self-tapping screws. The back wall is nailed last.
- Bottom and Roof. The bottom is screwed around the entire perimeter with self-tapping screws. It is better to make the roof removable. This makes it easier to care for the birdhouse. Once a year, the birdhouse will need to be thoroughly cleaned of old nests, so the roof is secured with only two screws. It should protrude by 3–4 cm, forming a visor in front of the entrance.
- The birdhouse is ready. It can be painted and decorated to your taste.

How to build a cardboard
Cardboard is not the most durable material, but birdhouses made from it also have a right to life. It is better to take thick cardboard. Binding cardboard works well. It holds its shape well and is easy to paint and process. Choose non-toxic ingredients, because birds will raise their offspring in this house!
Birdhouses made of cardboard will not be durable, but if everything is done correctly, they will survive the season.
To make such a poultry house, you need to adhere to the following steps:
- Development of sketches. You need to make sketches and clarify the dimensions.
- Drawing and cutting. Depending on the chosen design, a drawing is developed. All dimensions are transferred to cardboard and cut out using a stationery knife or jigsaw.
- Connecting parts. Assembly is carried out using wood glue. Its order is no different from the previous model.
- Finishing processing. Even the best cardboard is afraid of moisture. Therefore, such birdhouses need to be treated with special means. These can be protective varnishes and paints.
Out of the box (cardboard and paper)
Cardboard boxes can make life much easier for bird lovers. Birdhouses from them are made quickly and do not require special tools. 
Manufacturing stages:
- Decide where the entrance will be in the birdhouse and make a marking.
- Cut a hole in the intended location. Treat the cuts with moisture protection products.
- Attach the roof. All parts can be connected with glue or tape.
- Cover the birdhouse with varnish or paint. A beautiful painting adds color to your design. You can come up with interesting decorative details.
Bottle houses
Our industry offers such a variety of beverage containers that it is difficult to resist reusing them. Plastic bottles are an interesting material not only for children’s crafts, but also for such a useful thing as a birdhouse.
Manufacturing stages:
- Preparation. Plastic bottles with a volume of at least 1.5 liters are suitable. They must be clean and free of foreign odors.
- Make markings on the bottle. Mark the location of the tap hole. Cut a hole with scissors or a knife.
- Cover the sharp edge of the cut with tape or adhesive tape.
- Insulate and decorate the house with burlap, wrapping it with twine or tying it with thick yarn.
- If desired, you can paint the house with acrylic paint. This will add rigidity to the structure and give it a finished look.
Unusual and original birdhouses made from scrap materials
You won’t see any kind of birdhouses today. Designers are developing entire collections of these unusual houses from scrap materials. Amateurs are not far behind them. In the gardens you can see bird houses of the most intricate shapes and designs. For this purpose, traditional and modern technologies are used. 
The most popular types of original birdhouses are:
- Wicker houses made of wicker. Birds like these birdhouses. They are made from environmentally friendly material. Fans of weaving paper tubes can also use their skills to create a bird house.
- Houses made from cork. Wine corks are used for this. The material is durable and tolerates precipitation well. The only negative is the complexity of assembly. Therefore, it is used in combination with wood or plywood.
- Barrel birdhouse. Small barrels are shaped like nest boxes and are perfect for a bird's home.
- Shoe houses. You will need a large boot, which is hung on a tree at the desired height.
- Birdhouse made of branches. For such a house, the branches are connected with self-tapping screws or intertwined with rope.
- Pumpkin house for birds. To do this, use a special tableware pumpkin lagenaria. They simply make a hole in it for the tap hole.
Decorative and beautiful for the garden
Birds don't need painting. They can easily get by with a simple birdhouse. But for humans, a birdhouse is a space for creativity. So they appear interesting ideas for decoration.
How to decorate a birdhouse? Acrylic paints are used for painting. The birdhouse must first be treated with a primer. 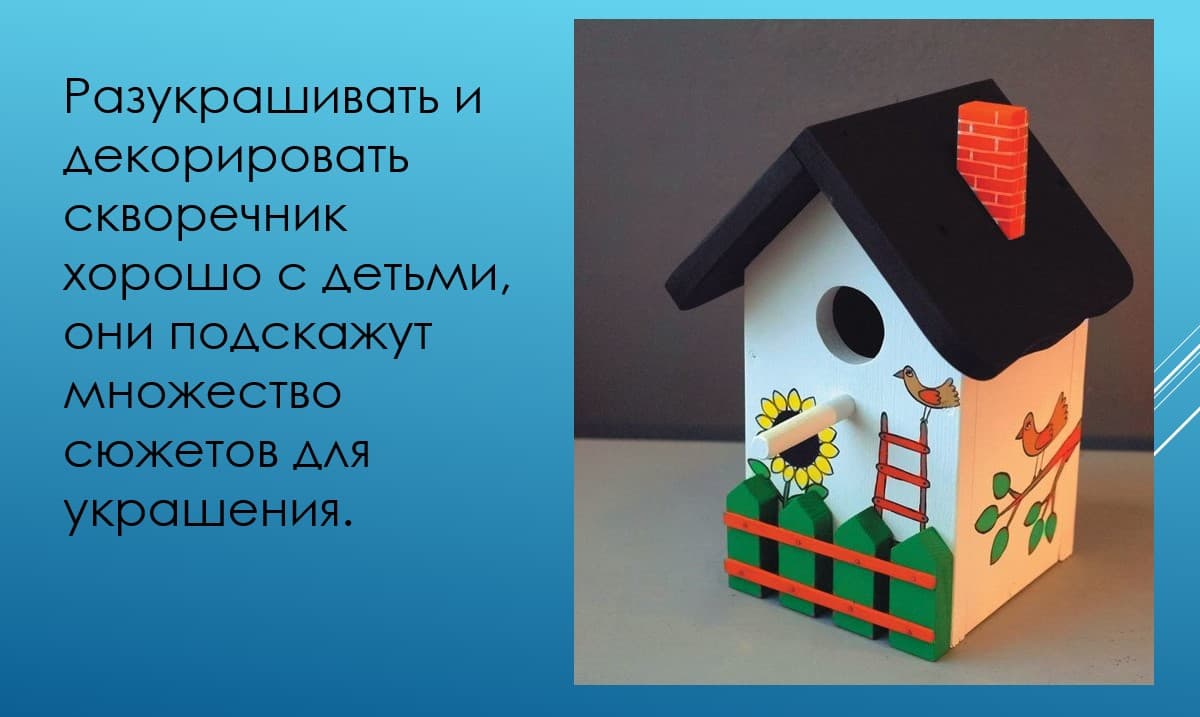
You can make a whole series “Seasons” and display changes in nature on the walls of the bird house. For those who do not know how to draw, appliques and decoupage are suitable. Just don’t forget this beauty is covered with varnish afterwards.
New Year's birdhouses
Such houses decorate gardens during the January holidays. Birds do not nest at this time. But the birdhouse can be used as a feeder. And in the spring this structure will turn into a real nest. You can decorate New Year's birdhouses with pine branches, berries and other materials, but only natural ones!
How to hang a house?
You need to attach a bar to the back of the house; it will be hung on the tree using bark. It is advisable to hang it vertically straight or tilted forward. If wire is used for this, it must be at least 2 mm thick; it is better to take stainless steel. You can hang birdhouses at any time of the year, but it is better when the birds return - in the spring.
Video
The video shows different options for bird houses:
Bottom line
Birdhouses installed in the garden attract different birds. Don't be upset if they don't settle in your house right away. Sometimes this takes time. Use a simple birdhouse base and all your imagination when creating the decor. Your efforts will be appreciated not only by your winged friends, but also by your neighbors, and even more so by the garden, which will reward you with a good harvest.
Feeders and birdhouses are successfully used to attract birds to the site; with their help, you don’t have to worry about the safety of the future harvest. Almost all types of birds live in such houses. In cold weather they eat wintering caterpillars, and in summer they eat pest larvae.

You can make a birdhouse with your own hands without spending money out of your pocket. After all, it is not necessary to buy new building materials; it is enough to use your imagination using improvised means.
Everyday materials
One of the simplest options is a birdhouse out of a box. To make it, a juice box is used, it is thoroughly washed and dried. Dignity this decision They consider: efficiency, original appearance and ease of execution. Materials you will need:
- clean box;
- thin wooden planks;
- acrylic paint;
- rope;
- glue.
It is worth preparing the following tools:
- scissors;
- brush.
Work begins with making a tap hole; it should have a diameter of 5-6 cm, and be located at an average height from the bottom of the box. A regular or stationery knife will help you cut the hole. Next, the birdhouse is coated with paint and left to dry.
You can use an ice cream stick to make a perch for the birds to sit on. It is glued to the base under the taphole.
The interior space in the birdhouse should also be comfortable for birds, so the front wall on the inside should be made rough. Therefore, a board made of untreated wood is fixed there; a piece of tree bark is also suitable. The outer walls are also covered with ice cream sticks - this will add aesthetics and allow the birds to cling to them with their paws.
To hang a birdhouse on a tree, make a hole at the top and pass a rope through it. To attract birds, just sprinkle a little food, then a family of birds will definitely settle in the house.
You can use a large plastic container as the base of the birdhouse. When making a birdhouse from a bottle, the process will remain virtually unchanged, you just have to make drainage holes at the bottom.
Cardboard is a practical option
To accommodate the largest number of birds, it is worth making a birdhouse from cardboard - this is the most affordable material. The resulting house can serve as a decorative element of the garden or be used for its intended purpose. The execution process is very simple and does not take much time. During the work you will need:
- two A4 cardboard sheets;
- colored paper or paints;
- compass;
- scissors;
- rope;
- small stick.
As a blank, look at the drawing or make it according to simple recommendations.
The basis of the future design is a sheet glued into a roll; you can take the remainder from paper towels. Using a compass, draw a circle with a diameter of 4-5 cm on it and cut out a hole. Next, the bottom is covered with a circle of the appropriate size - the base of the birdhouse is ready. To attract attention, it can be decorated, covered with colored paper or painted.
Making the roof begins by cutting out a semicircle, then gluing the straight edge. A thin rope is glued to the top of the dome and connected to the base. All that remains is to glue the stick near the entrance and pour in the food. Such a feeder can receive guests for a long time or simply decorate the garden.
Wood - standard production
There is a traditional option for making a birdhouse from wood. In the process they use:
- boards (20 mm thick);
- nails;
- hacksaw;
- hammer;
- drill;
- pencil and ruler.
The wood materials chosen are unplaned boards with a thickness of at least 20 mm. This ensures heat retention inside the house. As for the breed - would be better suited birch or oak, the smell of pine needles greatly repels birds. The use of pressed or laminated wood is undesirable - it is not a practical option and has a toxic odor.
After choosing the material, the dimensions of the structure are determined. Based on the parameters of the natural hollow (120x120 mm), it is worth making the bottom of the birdhouse 120x120 mm, the height should be 250-350 mm. These sizes allow you to accommodate a family with 5 chicks. With a larger number of offspring, adults cannot provide them with proper care. The size of the entrance is also taken into account; a hole of 40-50 mm is made for the starling, and 30 mm for the tit. The tap hole is placed at a height of 200 mm from the bottom level.
A perch is fixed in front of the entrance to the house, sometimes a small platform made of boards is installed instead. The roof can be gable or single-pitch, but it is worth considering one point - the board must protrude beyond the level of the facade by at least 50 mm. For the convenience of annual cleaning, the roof is made removable, then it is fixed with screws or wire. All dimensions of the elements can be seen in the drawings.
Before you make a birdhouse with your own hands, you should carefully consider the diagram, then cut the boards according to the parameters in the image. Process progress:
To make a good birdhouse from wood, you should follow the recommendations:
- To seal and retain heat inside the structure, all cracks should be coated with clay or sealed with tow;
- the surface of the wood should not have large burrs that could injure birds;
- you need to use short nails or screws so that they do not stick out;
- It is better to treat it with drying oil as a protective coating. But for decoration you can use gray or red oil paints.
Making your own bird house is not at all difficult; if you use your imagination, the result will become a real decoration of the garden. In the process of making a birdhouse from scrap materials, the most unpredictable base options can be used: pumpkin, stone, coffee pot, shoe.
House installation
In addition to manufacturing, the installation process of the birdhouse is important, so it is worth knowing the recommendations for its placement:
You can make a birdhouse at any time of the year, but it should hang on a tree in late March - early April. Then a family of birds will definitely settle in it.
Winter has always been and remains a difficult time for birds. Day by day, it becomes more and more difficult for these small animals to find food. Think about the birds and place a homemade feeder in your yard, because any available materials that we usually throw in the trash are suitable for working with. The article will present ideas and photos of ready-made solutions, the implementation of which will not require either complex drawings or any special skills.
DIY birdhouse
Think for yourself, it’s impossible to imagine all the splendor of the world around us without birds and playful trills. By their nature, these animals fill everything around them with harmony and life, and therefore even a tiny garden will look much nicer if there are birds in it.
By placing a feeder in a suburban area, you can daily observe the secret life of birds and the fascinating bustle of birds. Some of them will enter into fierce competition with other species, others will try to defend their own rights in the fight against their relatives. But they all always carefully look around, so as not to miss the moment of attack by any predator.

A bird feeder can be assembled with your own hands from the most different materials. However, there are certain general rules that must be observed during assembly:
- It is best to place the feeder on the wall of outbuildings or directly on tree branches. At the same time, the height of the placement should be at least half a meter, so that it is convenient for you to feed the birds, and so that cats cannot climb up to them.
- For small birds, the birdhouse should be made of appropriate dimensions so that larger animals cannot get inside.
- The corner walls of the finished structure should not be prickly or sharp.
- It's better if construction material, from which the bird feeder will be made, will have good resistance to adverse conditions and moisture. Otherwise, the birdhouse will not last long and will have to be replaced.
- Include special sides and a roof in the design of the feeder that will protect food and birds from wind, rain and snow.
- And most importantly, the feeder itself should always remain comfortable for the feathered animals, so that it is easy for them to remove food!


Advice! Do not forget that birds remember the place of constant feeding, and therefore are ready to fly a long distance to the desired place - in our case, a feeder. Based on this, birds must be fed daily, otherwise they may die!
Plywood bird feeder
Of course, you can always buy a feeder ready-made in a store, but it’s better to make it yourself, moreover, if it only takes a couple of hours. A plywood feeder can be made with a gable roof, a flat one, or without it at all. You can also provide a special hopper compartment if you know that you will not be able to accurately monitor the amount of feed inside. Naturally, drawings will be required for the work, fortunately they are presented on the Internet great amount developments with ready-made dimensions and dimensions for cutting. All you have to do is decide on the solution you like.

Important point! Do not neglect the drawing: firstly, it will significantly facilitate and speed up the work. Secondly, this approach guarantees that in the end you will get exactly what is shown in the picture.
Deciding on appearance future feeder, do not forget to take into account the bird population specifically in your region. After all, for example, pigeons are able to eat all the reserves, leaving tiny tits without food. Based on this, it is recommended to make the opening in the feeder so that large birds cannot get inside.

To work you will need:
- Beam with a section of 20 by 20 mm;
- Sheets of plywood;
- Sandpaper;
- Hammer;
- Water based glue;
- Electric jigsaw;
- Nail.


Operating procedure :
- First of all, all the elements are outlined on the plywood sheets, which are then cut out with a jigsaw. A square sheet of plywood with sides of 25 by 25 cm will serve as the bottom of the feeder. In this case, the dimensions of the roof should be made a little larger in advance so that water does not flow down the walls onto the feed during rain.
- To avoid burrs, the edges of the workpieces should be pre-treated with sandpaper.
- We cut 4 posts about 30 cm long from a block.
- If you want to make the roof flat, you should shorten a couple of bars by 2-3 cm.
- We fix all the parts with waterproof glue, and then fasten the structure with nails. We attach stands to the bottom of the feeder, to which we fix the sides.
- We fasten the roof to the racks with self-tapping screws.
- We install a feed container, add food and watch the bird feast.
Wooden feeder: photos and ideas
The main advantage wooden feeder for birds is that such a design holds its shape well and can serve for a long time, which in turn is explained by the considerable reliability and high characteristics of the tree itself. To assemble the feeder yourself, you will need drawings, as well as at least minimal experience in working with tools.

To assemble a wooden feeder you will need a board about 18-20 millimeters thick.
Next, we will consider a simple design option that you can easily do with your own hands, using the place of the drawing simple photo. For work you will need: glue, timber for racks 2x4.5 cm, nails, a piece of plywood sheet measuring 25x25 centimeters for the bottom, self-tapping screws and a couple of sheets of plywood 22x35 cm for the roof.

Work order:
- The first step, of course, is to assemble the sides and bottom of the structure. The bars, adjusted to the dimensions of the lower part, are assembled for fitting, the end sides are coated with adhesive, after which we strengthen the fastening using self-tapping screws. As a result, we get a small frame. In this case, it is recommended to make two parallel sides slightly larger than the base, about 5 centimeters, so that in the future you can install perches to them.
- We fix the bottom of the feeder to the finished frame and nail it.

- We fasten 18-20 centimeter racks from the inside of the resulting structure.
- We supplement the racks with rafters. To do this, we install a pair of bars at right angles, strengthening the joint area with the help of an additional bar. As a result, you will see a right angle with equal sides. You will need another similar part.
Important point! Fasten the blocks at right angles to the table; in this case, it will be correct if the wide side is on the table, and the additional block is on top!
- Next, we fix the rafters to the racks using self-tapping screws.
- We attach sheets of plywood to the posts, which will act as a roof. If you have a wooden corner, you can use it by making a skate.
- Don’t forget about the elongated sides - glue sticks or glazing beads to them, which will play the role of perches.

This way you can easily and quickly assemble a bird feeder with your own hands. The finished structure can be hung on a wire by a hook by drilling several holes in the ridge, or placed directly on top of any pole on the site. Inside the house, the food will be perfectly protected from rain and wind, and several birds will be able to fly to the feeder at once. Birds will love this kind of cozy dining room!
Photo instructions
If there is a gazebo on your country plot, then great idea will place a simple open feeder next to it. In this case, it will be sufficient to build a bottom and a side.

If you want to cover the feeder with varnish or paint, you should use water-based formulations only! This approach will protect the birds.
Birdhouse from a milk or juice box or carton
A beautiful bird feeder can be made from such simple things as a bag or box of juice or milk. Moreover, even a child can make a birdhouse. To work you will need:
- Stationery knife or scissors;
- Juice or milk box;
- Marker;
- Wire or nylon rope;
- Band-Aid.
The first step is to accurately mark and cut small holes on opposite sides of the box. The lower part of the window should be covered with adhesive tape to make it safe and convenient for the birds to fly out and take food from the feeder.

Using scissors, we make tiny holes under the holes; later here we will insert the cardboard rolled into a tube, left over from the holes made earlier. We insert a rope or wire through the holes in the bent corners of the future birdhouse and tie it to the branch. Ready!
The finished feeder can be placed on a tree branch, since the structure will not sway much in the wind. Feeding slots, which can be made on adjacent sides rather than opposite ones, will once again contribute to this. You can secure the craft more firmly if you attach a wire to one side of the feeder, tying it to a tree.

You can make a beautiful birdhouse with your own hands from several juice boxes. In this case, it is worth cutting off the third part from the first piece, cutting out a hole for the birds in the front - the element will become the bottom of the feeder or the feeding board. We cut the second blank along the sides, leaving the upper part untouched. We combine the components so that we end up with a triangle. You can connect the elements using tape or glue.
Crafts from small plastic bottles
Option 1. Simplest
We cut a couple of small holes symmetrically on both sides of the bottle. What shape is up to you to decide; they can be either rectangular or square, round or arch-shaped. Leave jumpers between the holes. The visor will cover your feathered friends from the rain; you can make it by making a cut in an inverted “P” shape, then bending the plate up.

The bottom of the hole in the new birdhouse should be covered with some material, be it fabric tape or adhesive tape - this will remove the sharp edges of the bottle, allowing the birds to sit comfortably.
We make holes at the bottom of the bottle at the same level so that later we can place the stick in a horizontal plane - a kind of perch for birds.

You can place the finished bottle feeder directly on the tree by wrapping the jumper with rope, tape or any other material, as in the photo.


Make holes in the bottle cap by inserting the ends of the twine into them and tying them into a knot, thus obtaining a loop with which you can conveniently fix the birdhouse on the branch of any tree in the yard.
Option 2. Hopper feeder
A bunker-type bird feeder is advantageous in that food can be poured into it in reserve, up to several days. At the same time, as the birds eat part of the reserves, the food will be automatically replenished.

This design will require a pair of identical bottles. The first one should be marked with a marker, then make small holes in the bottom, similar to the first feeder, and remove the top third of the bottle. We make a couple of holes at the top at the same level - later twine or tape will pass through them for hanging the feeder.

In the case of the second bottle, you need to cut several holes in the narrowest place - it is through them that the bird feed will pour out.
You should not make large holes; if necessary, they can always be expanded over time.
Finally, fill the bottle with food and screw the cap back in place, then simply place it in the rest of the first bottle. Ready!
Option 3. Spoon design
A hole is made inside the cork, where the twine is then inserted. After this, a couple more holes are made at the same level according to the dimensions of the spoon. The final hole is cut into the bottle itself, above the deep cupped area of the spoon. At the same time, it should be slightly expanded so that the birds feel comfortable eating in the feeder. At the end, all that remains is to fill the birdhouse with food.

A little advice! Moisture may accumulate inside the craft over time. You can avoid this with a simple solution: using a tiny nail or a heated needle, make several holes at the bottom of the bottle - this will allow moisture to escape as it accumulates.
Craft from a 5-liter bottle
Surely everyone has at least one 5-liter plastic bottle that lies idle. A bird feeder is quite easy to make with your own hands from this material. In addition, the volume of the bottle will allow you to place much more food inside for birds, and well-made holes will make it possible for several animals to feed at once!

Using a bottle as a birdhouse is a fairly quick and easy solution that kids can do too: just use wire or tape to place the structure on a tree and place a small supply of food inside. The only equipment you will need is a utility knife or pruning shears and, of course, the bottle itself.
It’s worth making a hole depending on how you plan to place the feeder on the tree:
- Vertically - 3 rectangles or a pair of square holes are cut at a distance of 5-7 centimeters from the bottom of the bottle;
- Horizontally - a pair of large holes are cut from the neck and bottom.

It is convenient to hang the future birdhouse from a bottle by twine or wire by the neck. When choosing a horizontal placement option, a couple of holes are made on the wall of the bottle, into which a rope is then passed for tying to a branch.
You can avoid the craft from swaying if you place a quarter of a brick inside, which will weigh down the feeder. Load the food on top and there will be no problems with rocking.
Bunker
If desired, a 5-liter bottle allows you to make a bunker feeder yourself. To do this, in addition to the mentioned bottle, you will need a couple more 1.5 liter bottles, a rope, a stationery knife and a marker.

Work order:
- First of all, we mark future holes for bird holes at the bottom of the workpiece. The ideal option is one large one and a couple of smaller holes. The first should fit a 1.5-liter bottle.
At the same time, it is better to cut a large hole in the shape of an inverted letter “P”; with this approach, the visor bent upward will cover the birds from rain and snow. As in the case of 1.5-2-liter bottles, the bottom edges of the openings should be sealed with some material, for example, adhesive plaster, to avoid injuring the birds on sharp corners.
- We also make holes inside the smaller bottle in those places where it will touch the bottom of the 5-liter container. An additional hole will be required just above the indicated location. Through them, as the food is eaten, it will spill into the feeder.
- It is necessary to make a round hole inside the lid of a 5-liter container so that when fully screwed in, the thread of the neck of the second bottle is visible from above.
- Remove the top and neck of the second container to create a funnel. We put it on the neck of the bottle placed inside, and then screw it with a cork.
- This creates a beautiful and convenient bunker bird feeder. All work is done simply and quickly with your own hands. All that remains is to fill the new birdhouse with food and place it on a branch in the yard.
By showing a little imagination, you can always use the same plastic containers to make interesting and unusual crafts for birds, which will not only become a real boon for birds, but will also nicely decorate the design of your garden.


Using a shoe box
For self-assembly of a bird feeder, any material lying idle on the balcony can be used. Boxes of shoes, food and utensils can also be used!
Preference should be given to boxes and cardboard, having a laminated coating! Thanks to it, the finished feeder can last much longer.
The main advantage of a birdhouse out of the box is that the initial blank already has a roof, walls and bottom. All you have to do is make small holes on the sides of a rectangular or square shape.

For work you will need: tape, a knife or scissors, and a nylon cord. As you know, cardboard cannot be called a durable material, especially when used outdoors. Therefore, it is worth wrapping it with tape, thanks to which the feeder can last at least until the next season. After making holes on the sides and fixing the new birdhouse with a cord on the tree, fill the container with food, and the birds will not have to wait long.
To prevent the craft from being blown around too much by the wind, you should place some pebbles or sand at the bottom of the box.
You can do everything differently. The lid of the box is placed perpendicularly so as to act as a stern stand, while the second part will act as a roof and side. In this form, the structure is glued with tape for greater reliability. A pair of hooks are made from a piece of wire, with which the “ceiling” of the birdhouse is pierced. The hooks are twisted and bent from the inside. Using hooks, the bird feeder can easily be fixed on a branch, as shown in the photo. All that remains is to put down the food and wait for your feathered friends.

Video ideas
The sounds of spring are cheerful drops, iridescent trills of birds returning home. Who doesn't love the aroma of fresh grass and first flowers?
Friends! Hi all! I started our conversation by “inviting” you to spring! And all because today we will learn how to meet birds, we will talk... The starlings have flown in from distant lands and have a family arrangement and joyful chants on schedule. So let's help them by making a house for birds, and then all their songs will be for us!
Let's clarify a few points:
- What are the requirements for garden structures?
- What can you construct a bird house from?
- What can be done by the hands of a child?
Now let's talk about all this in more detail. And at the end of the conversation I will share one design idea! So, go ahead!
Photos of birdhouses made from scrap materials are clickable:


Requirements for birdhouses
We don’t have to wait for our little ones to be given a task. to school or in kindergarten bring a birdhouse. An activity like building a birdhouse can be very interesting and worthwhile to devote your attention to without any outside encouragement. But to make the winged ones comfortable, we must take into account important factors:
- Suitable dimensions;
- Material;
- Fastening system for secure fixation.
Dimensions. First of all, you need to understand that, although this garden craft will hang on the street near the house, and therefore should also have the function of decorating the territory, we we do it is primarily for the convenience of the birds. Otherwise, all she will do is decorate the garden. No birds will live in it. This means we take into account the size of the winged aircraft for which we are building. But, if we start from the standard, then the height is 30-35cm; width - 15-17, and depth 13-15cm. Hole diameter 4-5cm.
Materials. You can use not only traditional wood, but also unusual materials. What can be built from: from willow vine, from newspaper tubes, from wine corks, from plastic bottles, plywood, cardboard, etc. The main thing is that if you use wet materials like cardboard, it is good to cover it with varnish in 2-3 layers so that it is not afraid of either snow or rain.
We secure the birdhouse. It’s worth thinking in advance about what to attach our craft to and with what. For example, you can nail a board to the back. Either nail it or tie it to a tree or pole.


Our birdhouse from a bottle - MK video
My son and I made it from an ordinary plastic bottle. Just need to paint with acrylic paints.
Video - birdhouse made of cardboard
Video - birdhouse made from jars
Master class edible feeder - cookies for birds
Master class OSB birdhouse in the shape of a rocket
The most common and most unusual birdhouses
When I look at photo birdhouses that are on the Internet or someone posted on their social networks, I’m surprised how beautiful they look and how creative they are ideas coming to people's minds. There is such a variety of shapes: round, diamonds, polygons... And what colors there are! Some people don’t paint them, while others paint them to look like Gzhel. Other options include apartment buildings. And near some it is attached feeder. This is also a very convenient option if you want birds to settle next to you for a long time and delight you every spring.
I really liked the teapot birdhouse.


What is the help of kids?
If it's all about gluing, for example if you're making a birdhouse from boxes, then the children can participate in the very process of designing, cutting and assembling. But, if the house is traditionally wooden, and the baby is too small, do not refuse his help when he gives you nails or non-sharp and not heavy tools.
Another option to make the craft unusual is original drawing. Give your little one a brush and some paint and let him create! Such a birdhouse can safely be called a joint product.
A few more photo ideas - original, but also more time- and effort-intensive birdhouses.
Blueprints
According to the drawings, you can make not only wooden, but also cardboard birdhouses. Even a birdhouse is made from twigs or newspaper tubes according to drawings. All pictures are clickable.
Next time there will be a master class on making a wooden birdhouse.
I really want to believe that now we will all look forward to spring, and the birds will not have to look for where to settle and raise their winged offspring. I hope you and your kids enjoy designing and making! I think this is not the last time you show your Creative skills. And in the future there are others waiting for us all interesting articles, where we will build something. Therefore, don’t forget to subscribe so you don’t miss any of our fruitful conversations! And don't forget to invite your friends. I think they will also be curious to learn and share their knowledge!
That's all for today! Bye!